Showing posts with label copic colouring. Show all posts

Tuesday, 12 July 2022

Heffy Guest Designer


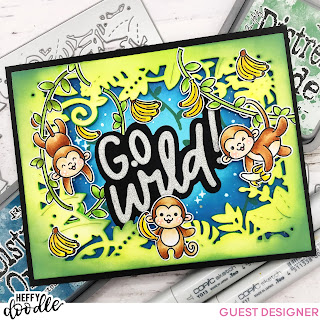
Hi it's Natalie here and I'm so excited to have been asked to be July's Guest Designer for Heffy Doodle. The critters are just the cutest and I had so much fun creating this Jungle at night scene card. 
I began my card by cutting out the Go Wild (A2) Frame Dies and ink blending them with a mix of Twisted Citron and Mowed Lawn Distress Oxide inks. I also cut the frame out of green fun foam to add some depth and create the impression of a deep, thick jungle. 


Next I needed to create the night sky so cut out a piece of white card to fit behind and layered on Chipped Sapphire, Uncharted Mariner and Tumbled Glass Distress oxide. To which I spritzed on water and dabbled it off and splattered on some gold watercolours to resemble stars. Once this was dry I added the vines using Rustic Wilderness Distress Oxide and the vine stamps from the Chimply the Best Stamp Set. 
S


I stamped out all the chimp images, the bananas and vines with memento tuxedo ink on to copic paper and coloured them up with copic markers. For the monkeys I used E37, E35 and E31 for the fur and then E31 and E42 for the faces adding R20 to the cheeks and ears and R32 to the tongue. Finishing them up with some White gelly roll pen dots on the cheeks and black on the dotted eyes.  I don't have the Chimply the Best Coordinating Dies so I fussy cut my images but I'd definitely recommend  getting the coordinating dies as they are a little fussy to cut and the dies would save so much time. 


For the main sentiment I used the big Go Wild die in the Go Wild (A2) Frame Dies using black card for the shadow part and Silver Glitter card for the letters. The black just makes it really pop and I thought the silver works well for the night sky look. 
When adhering everything to my card I tried to add some dimension by adding vines behind the lettering and underneath the frame alongside some of the bananas too. 
Once everything was adhered I added some dots and stars to the sky using the same white gelly roll pen and that was my card all finished up. I hope you enjoyed my tutorial for today be sure to come back soon for some more inspiration. 


Saturday, 21 May 2022

Meow you Doing?

Hi everyone it's DT member Natalie here with another sweet kitty card. I just couldn't resist colouring them up again they are just so fun! I teamed the kitties with the new Pawsome Dies and Pawsome Rainbows Paper Pad
I began by cutting out a base out of white card by using the Imperial size Layering Dies and then taking the Pawsome Dies, I randomly cut out paw prints around the card. I used the biggest one at the bottom and got smaller as I went up as I thought it was more aesthetically pleasing. This was then popped over the top of a sheet of the Pawsome Rainbow Papers using foam tape to add a bit of depth. 
The cats I stamped from the Puurfect Day and the Hey There Critters Stamp and Die Sets. I used Mememto Tuxedo Black ink to stamp and coloured them up with COPIC markers and cut them out with the coordinating dies. Using some black and white Gelly Roll pens I also added some finishing touches on their noses and cheeks and adhered them onto the card. 
For the sentiment I white heat embossed onto black card and cut them out into strips and laid one next to each kitty. Then just popped it all onto my card base and that was my card all finished up. 
I hope you like the finished result you can find all the items in the Time for Tea Shop and if you want to purchase anything there you can get 10% off your order using code T4TNATALIE10T4TNATALIE10. Have a great weekend and I’ll see you next week ❤️

Saturday, 19 March 2022

Have a Cool Birthday!


Happy Saturday Teatimer's anyone else longing for warm summer days again?! It's been so wet and miserable recently that I decided to create my own summer's day instead, I just love that cheeky little skunk with their two fab ice lollies. It does look a tad warm in front of that hot sun though.
To make my card I used the Skies the Limit Slimline Dies which I cut out twice from white 360gsm card making sure to keep all of the cut out pieces. I then adhered the two die cuts together and layered on top of another piece of white card. 
Taking the die cut pieces I ink blended Squeezed Lemonade and Dried Marigold for the sun and Tumbled Glass and Faded Jeans for the sky. Adding splatters on top using the same colours. Once dried I adhered the pieces back together. 
For the grass I took some white card the same length and used the Slimline Hillside Scene Dies to cut out the grass. I ink blended this with Twisted Citron and Rustic Wilderness Distress oxide again adding splatters with the same colours. 
The last thing to do for my card was colour up those cute critters from the Cool Critters Stamp Set. I used Copic markers to colour them up using a small range of colours so they all coordinate. I finished them up by adding some extra details to their cheeks and the skunks ice creams with white gelly roll and some pastel coloured Signo Uniball pens. Once they were all coloured I cut them out using the coordinating dies and adhered them to my card using foam tape to add some depth. 
The last thing to do was add some dots and stars using the pastel pens and a gold gelly roll pen to add a little texture and some more details and that was my card finished up. I hope it brought some sunshine to your day! You can find all the products in the Time for Tea shop and get 10% off your order using code T4TNATALIE10. 


Saturday, 19 February 2022

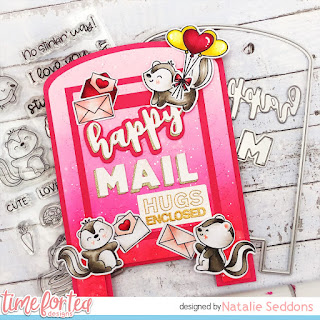
Happy Mail, Hugs Enclosed!


 Happy Saturday Teatimer’s, have you had a good week? You might have seen this cute card during the blog hop last week, so I thought I’d share with you all how I made it. 

I finally got to use the Happy Mail Gift Card Holder Die Set. I didn’t use it as a gift cardholder though, I just used it to create a fun shaped card base. I wanted some texture on my card so cut out the Dotty Hearts Cover Plate Die and ink blended Abandoned Coral, Picked Raspberry, Kitsch Flamingo and Spun Sugar Distress Oxides over the top to give and ombré look. Finishing off with a few splatters of water to give some texture and some splatters of gold water colour paint.

 Setting that aside to dry I stamped cut out and coloured up the skunks from the Stinkin’ Cute Stamp Set. I coloured them up with COPIC markers and added some finishing touches with white gelly roll pen. The letters are from the Happy Mail Critters Stamp Set and the Be Kind Be You Stamp Set which also contains the hugs enclosed sentiment (which I stamped and heat embossed in gold) then the balloons are from the Smitten Kitten stamp set. I really do love to mix and match my sets! Once all the colouring was done I could began adhering my card together.

I cut out the biggest of the two mail box dies the larger rectangle and the letter box die out of hot pink card. Then taking the Dotty Hearts panel I cut the smaller mail box out of that and to save my card being bulky and time I cut out the smaller rectangle in the middle. Then layered everything on top of each other as you can see the larger pink rectangle covered the hole.

Before adding my critters I needed to make the rest of my sentiments I used the Happy Mail die from the Happy Mail Gift Card Holder Add on Die Set which cut out in gold and white and layered on top of each other to create a shadow and used the same hot pink for the happy bigger shadow. 

Then I just adhered everything together using foam tape on the critters to give some added depth and dimension. To make the card base I just cut out the bigger of the two mail box dies from white 360gsm card twice and scored one of across the top about 2cm down and added double sided tape above the line and attached my card together. Then all was left to do was adhere the top and that's my card finished up. I hope you like my card for today it's super fun and great for just sending happy mail to a friend. You can find all the products in the Time for Tea Shop and get 10% off any orders using code T4TNATALIE10. Have a great weekend and I will see you all next week. 

Saturday, 25 December 2021

Merry Christmas!


Merry Christmas everyone it's DT member Natalie here with a super cute Christmas card for you today. I just had to sneak in a last minute Christmas card with the Dachshunds. 
It was a pretty quick card to make I already had the Dachshunds coloured up. I love having pre coloured images ready it makes my life so much easier especially when time is short around this time of year. These cuties are new in the shop and are called Stop Dachshund Around. I also used the Sweet Summer and Brighter Days Paper Pads to paper piece there cute jumpers. 
To make the background I used the 
Falalala Die set to make the base which is one of my favourites at the minute it also includes gorgeous snowflake dies. 
I cut the die out of white card stock and ink blended a combination of blue distress oxides on the inner panel. I finished it off with a spritz of water and added some splatters of white acrylic paint. This just gives some added texture. 
Whilst this was drying I cut out another one of the falalala die again in white card stock and used the Slimline Hillside Border Dies to create the snow bank. With the off cuts I also cut out my snowflakes. 
Then all what was left to make was the sentiment. I love big sentiment dies and the Let it Snow one is so much fun. I cut out the sentiment in red glitter card and used some velum to cut out the back piece. I like the added interest of the velum but that you can still see the background behind. 
Then all was left to do was stick everything together I only glued the velum behind the sentiment so that you couldn’t see the glue and I added some foam dots to the dogs to give them some dimension and that was my card finished up. 
I hope you have a wonderful Christmas and a Happy New Year. Also don’t forget if you want to treat yourself in the shop you can get 10% off any orders using code T4TNATALIE10 ❤️ 

Saturday, 20 November 2021

Falalalala!


Happy Saturday everyone it's DT member Natalie here with a fun Christmas Coffee card for you today. The little reindeer's from the Happy New Year Critters are just one of my favourite designs from Jo and you can guarantee they will appear in so many of my Christmas designs. 
I was unsure what to make for my post today so tipped out all my coloured images I already had and  and had a tonne of the reindeer's left over. There was also the coffee cart and the hippo which got me thinking that the reindeer's might like a caffeine pick me up before they take to the skies on Christmas Eve. The hippo and coffee cart which are from the Snappy Before Coffee stamp set weren't quite the right colours though so I stamped them up and coloured them in more traditional Christmas colours.  
The base for the card is the Falalalala Scalloped Slimline Dies which is another one of my favourite Christmas Dies I added some Chipped Sapphire and Salty Ocean for the sky using the darker colour at the edge and blending it to be brighter in the middle. Once everything was stuck together I felt like it needed a few finishing touches with the snowflakes and I added some white gelly roll for some smaller stars and falling snow. 
I just love how this card turned out its such a fun design and I hope you like it too! You can find the products in the Time for Tea shop and get 10% off any orders using the code T4TNATALIE10
Have a great weekend and I'll see you all next week 💖


Saturday, 18 September 2021

Snappy before Coffee!


 Happy Saturday Teatimer’s this weekend has rolled around fast. Have you had a good week? Lots of crafting? That's hopefully my plan, it will be so nice to have a chilled out day. 
I know you all love coffee cards so I have a fun one to share with you today I just love a good pun don't you?!
The shape of my card didn't start out like it ended so I had originally cut out a stitched rectangle but I changed my mind after stencilling the sky and cutting out the grass. There was so much empty space so I used the new Square Label Dies to cut it out instead I like how the stitched detail stayed at the top and bottom though. Then I darkened up the sky edges with some chipped sapphire distress oxide to draw your eye in to the image. The sentiment is also stamped with the same ink. 
The crocodiles are from the new Snappy Before Coffee Stamp Set . They are super fun to colour I used the same yellow for their spikes and belly but darker greens on one and added some little spots and rosy cheeks. I coloured up the coffee cups and die cut everything out and adhered everything together. 
The it was time to make my card base I followed some kraft cardstock in half and took out one of the larger Square Label Dies. I popped the die onto the fold of the card making sure the part of the die that's on the fold is just hanging over the edge so it doesn't cut that part. Once it was made I added some splashes of coffee using the Coffee Stain 6x6 Stencil and adhered the rest if the card on top with some foam tape to give it some depth and that was my card finished up. I hope you like it it's a really quick one to make so great for any last minute needed cards. Hope you have a great weekend and don't forget you can get 10% off in the shop using code T4TNATALIE10 💖


Saturday, 11 September 2021

Have a Howling Good Day!


Happy Saturday Teatimers! So release day came did you get anything? What's your favourite product? 
As usual Jo has rocked it with this release there's cute critters, a fab new standalone die which I've used so much! Then who doesn't love coffee products!
As soon as I saw the cute Dog Gone Mutts Stamp set I knew I had to create a cute scene card with a white picket fence and the red dog kennel. 
I stamped out all the critters, accessories and the sentiment and set them aside then began to work on my card base. I used the middle sized Slimline Scalloped Nesting Dies to cut out the card base. I cut it twice out of 360gsm white card stock and on the back one scored a line one scallop down all the way across the top to create the fold for the card and taped it using strong double sided tape. 
For the scene part I used the rectangle from the Slimline Postage Stamp Frame Dies but it was a tad too long so I just chopped off about 5mm's off the edge. I ink blended this with Tumbled Glass and hint Chipped Sapphire around the edges to darken it up a little. I also added a few Chipped Sapphire splatters for a little bit of interest. The grass I cut another rectangle out and used the Landscape Edge Standalone Die I just had to cut half and then line it up to cut the other half as they aren't quite long enough. I did this twice and then inked them up using Twisted Citron and Mowed Grass Distress oxides. Then for the last part of the background I used the clouds and Picket Fence from the Windmill add on die set. I just cut them from white card stock and left as is. 
When I'm colouring I try not to use too many colours so it's not too hectic so used a range of browns and warm greys for the dogs. Then used the same brown for the wood on the kennel and a warm red for the rest of it and pop of yellow for the ball. I like how the final colouring turned out and I didn't need loads of colours to get them all looking different apart from two of the dogs but they aren't next to each other so I think it works ok. 
Once they were all coloured and die cut I just stuck everything together as the grass was a bit longer than the sky panel I just flipped it over once it was stuck and used the edge to guide my scissors. 
I love the final look of the card and I hope you do too! If you haven't treated yourselves yet you can get 10% off in the shop using code T4TNATALIE10. 
Hope you have a great weekend and I will see you again next week. 


Saturday, 28 August 2021

Celebrate, make a wish ❤️


Well Saturday has come around again quick Teatimers hope you all having a great bank holiday weekend. I shall be back at work Monday so making the most of my last two days off and the sun is out today too!
This week I wanted to build on my birthday card collection I never seem to have one when I need one you know. The new Birthday Bear Clear Stamp Set is perfect for this its such a cute set and doesn't have to be used for birthday. I stamped out my critters and coloured them up and tried to shade them so they look more 3-D you can see on the bear where I added darker browns under their chin and places I thought would be in shadow. Once coloured up I cut them out with the coordinating dies and left them to the side whilst I worked on the rest of the card. 
I used the Large Scallop Celebrate Frame Dies to cut out the background and ink blended using a combination of Shaded Lilac, Dried Marigold and Kitsch Flamingo Distress Oxide Inks. I spritzed with water to add some texture and set aside to dry. 
For the sentiments I white heat embossed the make a wish sentiment from the bear set and cut out using the matching dies. The celebrate is from the die set we used to cut out the base I cut it out twice using white and the same deep purple cardstock I used for the other part of the sentiment. 
Once the base was dry I used the new Bokeh Bubbles 6x6 stencil with white pigment ink to create some circles just for some added interest. Again setting it aside to dry.
Once everything was dry I adhered everything together and finished up with some sequins and adhered it onto the same deep purple card stock and popped it onto my card base. 
I hope you like my card and have a lovely weekend!
If you want to treat yourself in the Time for Tea shop don't forget you can use code T4TNATALIE10 to get 10% off your order 💖


Saturday, 14 August 2021

Bee Happy!


 Happy Saturday Teatimers this weekend has rolled around fast don’t you think. I have a sweet bee scene card to share with you this week. You know how much I love my scenes so as soon as I saw the new Beehive Slimline Die I knew I had to create an abstract cloudy sky with it. 
I began by cutting out the Beehive die then used this as a guide to cut out the base for the blue sky. I used peacock feathers and tumbled glass distress oxide to blend the sky. Then popped the beehive straight on top. If I made it again I think I would have added some dimension here so it’s not so flat. The best part for the scene was the grass which I cut using the Slimline Hillside Scene Dies I created a little hill so that the bee on the left could reach the beehive a little easier and then there was more blue on the other side for contrast. 
The bees are from the Bee Happy Clear Stamp Set and are so simple to colour as they are quite small so great for quick cards. Once I’d coloured up all my elements I popped them onto my card and added my sentiment which I white heat embossed onto black card stock. I thought it was missing something though so added some flicks of green onto the green to look like blades of grass. Then stamped out some cute little flowers and popped them on. 
Last thing to do was to pop it onto my card base and that was my card finished up. I wished I’d added a little dimension but you know everything is a learning curve. 
I think the Beehive slimline Die is so versatile too and will definitely be a go to die in my stash. I hope you love it too! If you want to buy any of the products in the shop today you can get 10% off using code T4TNATALIE10. 
Have a great weekend and I will see you all next week ❤️

Saturday, 31 July 2021

Have a Cool Birthday!


Happy Saturday Teatimers! So what did you think of the new release, What's on your wish list or did have to have it all? 
I just love the Cool Critters set I love the little kitty with their Twister Ice lolly and I couldn't resist giving the racoon a little Fab lolly. 
To make my card I stamped out all the images from the Cool Critters stamp set, I always do three of each so while I have my pens out I can colour up a few at a time. This always helps when you need a quick card later on as they are already cut and coloured up and ready to go. 
There wasn't a lot of fancy colouring I just added some dots for texture on the ice cream. Then to make the Fab lolly I used my coloured Gelly Roll pens to add the sprinkles then cut them out with the coordinating dies 
Going with the Twister theme I really wanted to create a fun summer background with the Slimline Candy Stripes die unfortunately this is no longer available in the shop at the minute if you haven't got it  though you could use and striped die or maybe a striped stencil. I cut the die out with white cardstock, pink and green paper and then out of white fun foam. I love using fun foam as an alternative to foam tape when it's quite a fiddly die to stick. I stuck the white card onto the foam tape using cosmic shimmer glue.
I made up a white card base just a little wider than the die and stuck my foam base straight onto that. Next I just laid and stuck in my coloured pieces in a pink, green and then leave a gap pattern. 
I was just going to stick my critters and van straight on top but I'd gone for the same twister colour scheme for the Ice Cream Van and it blended into the background too much. To counteract this I used one of the circle dies from the new Simple Circle Dies to cut out a velum circle which I popped underneath this just mutes the background colours a little so your focus is on the Ice Cream Van. 
Once the van was in place I popped on my critters and added my sentiment which I white heat embossed onto black cardstock and cut out with the coordinating dies. I just love how Time for Tea coordinating dies cut out the sentiment too. 
I hope you like my card for today the new release is just super fun if you would like to pick any of it up in the shop or anything else you can get 10% off your order using code T4TNATALIE10
Have a great weekend and I will see you same time next week 💓


Saturday, 3 April 2021

Hoppy Birthday!


Well its Easter Weekend so I couldn't resist making a super cute bunny card! We aren't planning much this weekend but the little man is excited for an Easter egg hunt in the garden hopefully the weather is kind! How about you?
I used so many sets to make this card I find it so hard just sticking to the one but that's what we love about Time for Tea right everything just works so well together. I started my card by cutting out the largest rectangle from the Slimline Scalloped Nesting Dies and stencilling some clouds on there using the Scene it 6 x 6 stencil and some Tumbled Glass Distress Oxide ink. The grass was cut out from another of the large rectangles I cut using the Landscape Edge Standalone Die I just had to join it up and cut it twice to cover the length of the card. This was coloured with Twisted Citron Distress Oxide and a little bit of Mowed Lawn to give the edges some depth. I cut the fallen tree trunk using the Lift the Flap Slimline add on die  which I stamped on a woodgrain effect using the A5 Woodgrain Stamp  using dark brown distress oxide and going over with a lighter one. Then I cut the straight edges a bit wobbly to make them look more wood like. 
The flowers are cut from the spring blooms kit I blended a range of green, yellow and orange oxides for the leaves and some pinks and oranges for the flowers then die cut them out. 
All the stamped images I coloured up in Copic marker the images come from a range of stamp sets including Treat Yourself , Hip Hop Hurray, Life's Ups and Downs and Bears Picnic.


When I popped my card together I felt the layout didn't work with all three flaps open so I just had the middle one that opened and covered up the edges of the other flaps with my flowers and bunnies. Once everything was stuck down I popped on my sentiment and stuck it on my card base and that was my card finished up. I hope you like it and have a great weekend. Don't forget you can get 10% off in the shop using code T4TNATALIE10


Saturday, 13 February 2021

Cosy Days by the Fire!


The weekend is here and we have made it to half term whoop! That means more crafty time for this momma, so I hope your ready for more Smitten Kitten cards. Its been so cold and snowy this week I just wish I was curled up by the fire like these cuties. 
I began by cutting out the rectangle die from the Autumn Scene Cover Plate Die set and added a little Wild Honey Distress Oxide to give a warm glow and my base was ready for my scene. I coloured up the fire from the Warm Winter Wishes stamp set using some light warm greys so that the flames are the main pop of colour. The cats again I coloured up with the warm greys and added some E95, E97 and E99 for the ginger colour. When placing them on my scene I felt like it needed something else to make it look a little more cosy so stamped out the blanket from the Plaid Background Clear stamp set. I popped these all onto the card and added my sentiment from the Be Kind Be You stamp set. 
I finished my card off by mounting it on some burgundy card to match the rug and popped it on my card base. A quick and easy card for today, I hoped you like it, don't forget if you want to purchase ay of the items in the shop you can get 10% off using code T4TNATALIE10


Saturday, 6 February 2021

Hello, I love Mew!


Happy Saturday everyone I have a quick and simple card to share with you all today. It's a layout I've used a few times and works so well. I used the Hello Rectangle Nesting Die to cut out my base it a really great notecard size. Then used the A7 Essential Stripes stamp to create an orange sunset feel using a combination of squeezed lemonade and spiced pumpkin distress oxides.
You have to make sure this is really dry before cutting out the Hello Die otherwise it will smudge, so I  popped it to the side whilst I stamped and coloured up my kitties. You can find this loveable pair in the Smitten Kittens stamp set, its my absolute favourite from the new release. I kept the colours really light just added a little warm grey to both then some spots to the one on the left using E97 and E95. 
Before cutting out the hello I added the I Love Mew underneath the stripes and again made sure my ink was dry before I cut the hello. I cut out the hello on the card making sure to keep the centres of the letters too and out of some fun foam so I could pop it up on my card. I also cut out the matching die for the kitties out of the fun foam too so I could match the height of the hello. 
To put my card together I popped it on my card base then stuck down the fun foam letters where I cut it out then stuck the stamped letters on top. Next carefully adding the inside of the O and the E. I added the fun foam die cut to the kitties but cut off a bit at the top where it layered over the Hello and that stuck it down. That's my card for today I hope you like it and if you want to buy any of the supplies you cab get 10% off in the shop using code T4TNATALIE10 Hope you all have a good weekend and I will see you next week!


Thursday, 21 January 2021

Sneak Peek Day 3!


It's the last day of peeks and what a cute release, hard to pick a favourite eh! Today we are sharing the Happy Mail Critters stamp set, it comes with the sweetest critters and a great selection of accessories. 
I just love this sweet kitty and it will work so well with so many other Time for Tea sets. I couldn't resist getting him to climb on the boxes to post his letter. 
I love the clean and simple look of this card the pinks really pop against the white. I used the Hello Rectangle Nesting Die set to cut out my base then stamped the Essential Stripes A7 stamp set to add with some Worn Lipstick Distress Oxide. This takes a while to dry so I popped it to the side whilst I stamped and coloured my images. I used the same Pink Copic tones to colour the letterbox and and accessories. I used a soft blue on the mail and some warm creams for the kitty. Then die cut them out and popped them on my card. I finished off with the sentiment from a great new sentiment set called Be Kind, Be You. 
For more peeks don't forget to watch Jo's live tonight and 8 and the new release will be live in the shop tomorrow. Don't forget you can get  10% off your order using code TIMEFORTEANATAIE10


Saturday, 9 January 2021

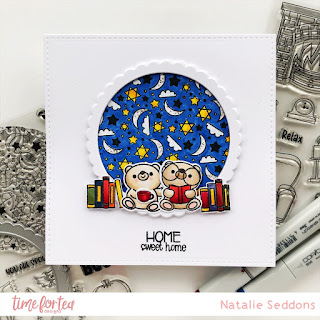
Home Sweet Home


Happy Saturday everyone,  It's been a long week and I'm so ready for the weekend. I'll be staying home and catching up some missed crafting after a our first week of home school. What about you? Are you creating this weekend?
This week I was sad I didn't get to use the Spooktacular Stamp set as much as I wanted to at Halloween so I tried to think of ways to stretch it. I love to stretch my stamps as we know they aren't cheap so I like to get the most out of them.
I decided to combine it with the bear and accessories from the Home Sweet Home stamp set and another of the bears from the Bearing Gifts stamp set. I love that the bears all work so well together.
I started by cutting out three squares from the Quilted Square Nesting Dies two will form our card base and the other I used for the front of the card. I stamped out all my images and coloured them up with Copic Markers, the sky I just coloured up really simply with no shading other than with the little moons. 
The bears I chose some soft browns for so that they would stand out against that dark sky. Then for the books I like to not use too many colours so it doesn't distract the eye and keeps the card more uniform. I used the same yellow as the stars and used a darker shade of blue of the sky and mixed in some rich reds, and oranges. Then using the same red for the little cup. 
Once everything was coloured up I Die cut them out for the books though I removed the shelf that was under them afterwards as I wanted it to look like they were stacked up on the floor next to them.
I also needed to cut out the scallop circle die from the Spooktacular Coordinating Die set again out of white card this will just frame the sky like a window but still be quite subtle.
I popped everything on my card and then finished it up with the Home Sweet Home sentiment and that was my card finished up. I hope you like it and don't forget you can get 10% off in the shop using code T4TNATALIE10
Have a lovely weekend and I'll see you again next week!

Saturday, 12 December 2020

Merry Christmas!


Happy Saturday everyone, it's DT member Natalie here with another Christmas card tutorial. Are you still crafting away like me? I always aim to be more organised but it never happens.
As you know I love the new Die-namic Display card die so I had to make another one. This time I created a little North Pole scene with the cute penguins from Skating by Penguins and those happy little reindeers from Happy New Year Critters
I always colour in the background before I die cut it so the ink goes over the creases easier. I used Chipped Sapphire and Stormy Sky  then spritzed on water to create some texture and added splats of Picket Fence Distress Spray. I find it goes everywhere so I don't spray I take it out the bottle and just tap it on. I then set it aside to dry and stamped out my images and left them to dry too as I have a tendency to smudge the ink. Whilst they were drying I cut out the snow banks and added the sentiment on the bottom of the front one.
The critters were coloured really simply with Copic markers because there only small not much blending was needed. I finished off the colouring with some rosy cheeks and 3 dots of white Gelly Roll pen on them. I die cut them all out along with some extras I'm always so thankful to have the dies when I'm mass producing it saves so much time. Once everything was cut it was time to stick it all together.
The Display Card Die was super easy to use I do go over the creases again though with my bone folder to make them extra crisp. 
I just imagine the North Pole to have this endless supply of  Candy Canes where they just grow from the snow like flowers, and if you have watched the Christmas Chronicles you know Reindeer just love them! So you know Mrs Claus likes to make sure they are well fed they have to have that sugar fuel to deliver all those presents! 
So yes that's the story behind all those candy canes I just popped everything on and that was my card finished up. 
I hope you like it and have a lovely weekend. Don't forget you can get 10% off in the shop using code T4TNATALIE10


Saturday, 5 December 2020

Let it Snow!


Hi everyone Natalie here with another cute Christmas card to share with you all. I just love the new big bold Let it Snow Sentiment Die it's great for using as the main focus piece of your card. The new Skating by Penguins work so well with it and add a super fun touch. 
I started out by cutting out the Falalala Scalloped Slimline Die twice then popped out one of the insides of the frames to create the snowy sky. I wanted it quite bright so mainly used Faded Jeans and a light touch of Chipped Sapphire at the edges. I then spritzed it with some water and blotted it to add some snow texture. Setting this aside to dry I cut out a snow bank out of the other inside we cut out using the curved die from the Die-namic Display Card Die which I left plain white. The Let it Snow sentiment I cut out of white cardstock and then red glitter card and layered them together to give it some more depth. 
The penguins, snowballs and robin are all coloured with Copic markers once coloured in I cut them out with the coordinating die set and then popped my card together.
The card isn't a regular card base I used some red tape to stick the frame piece together with the inside. Then used that to measure out two pieces of white card the same size. One of them I stuck straight to the front panel. The other I scored a line across the top about 1cm down then added some red tape above the score line and attached it to the front panel and that was my card finished. 
As always you can get 10% off in the shop using code T4TNATALIE10 have a lovely weekend and I will see you next week!