Saturday 25 April 2020

Dream Big!


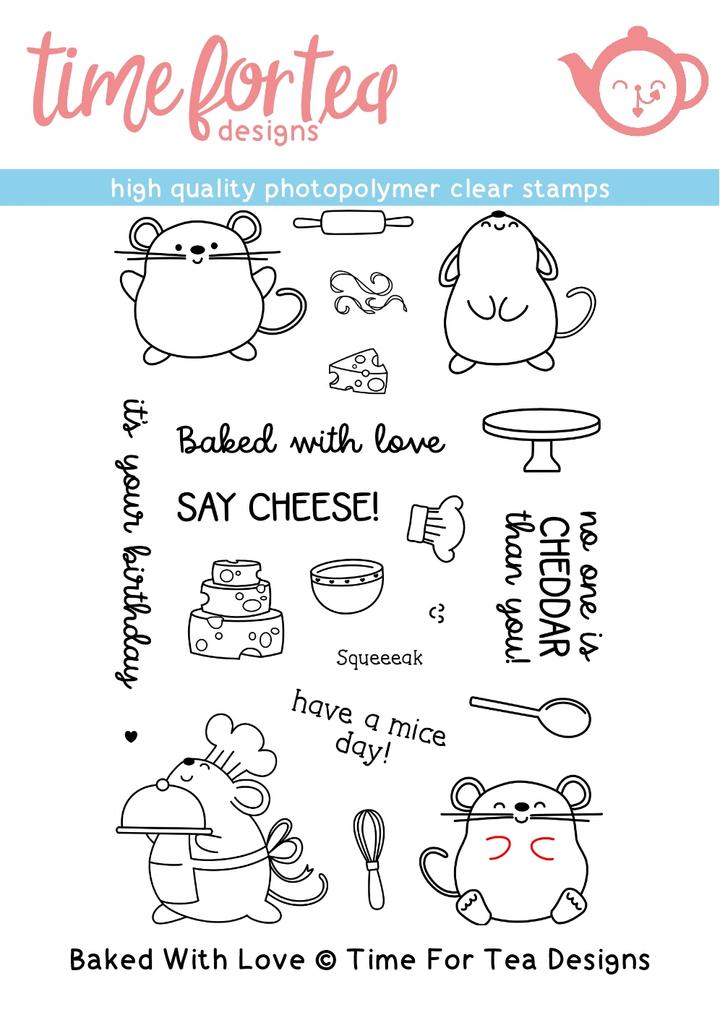
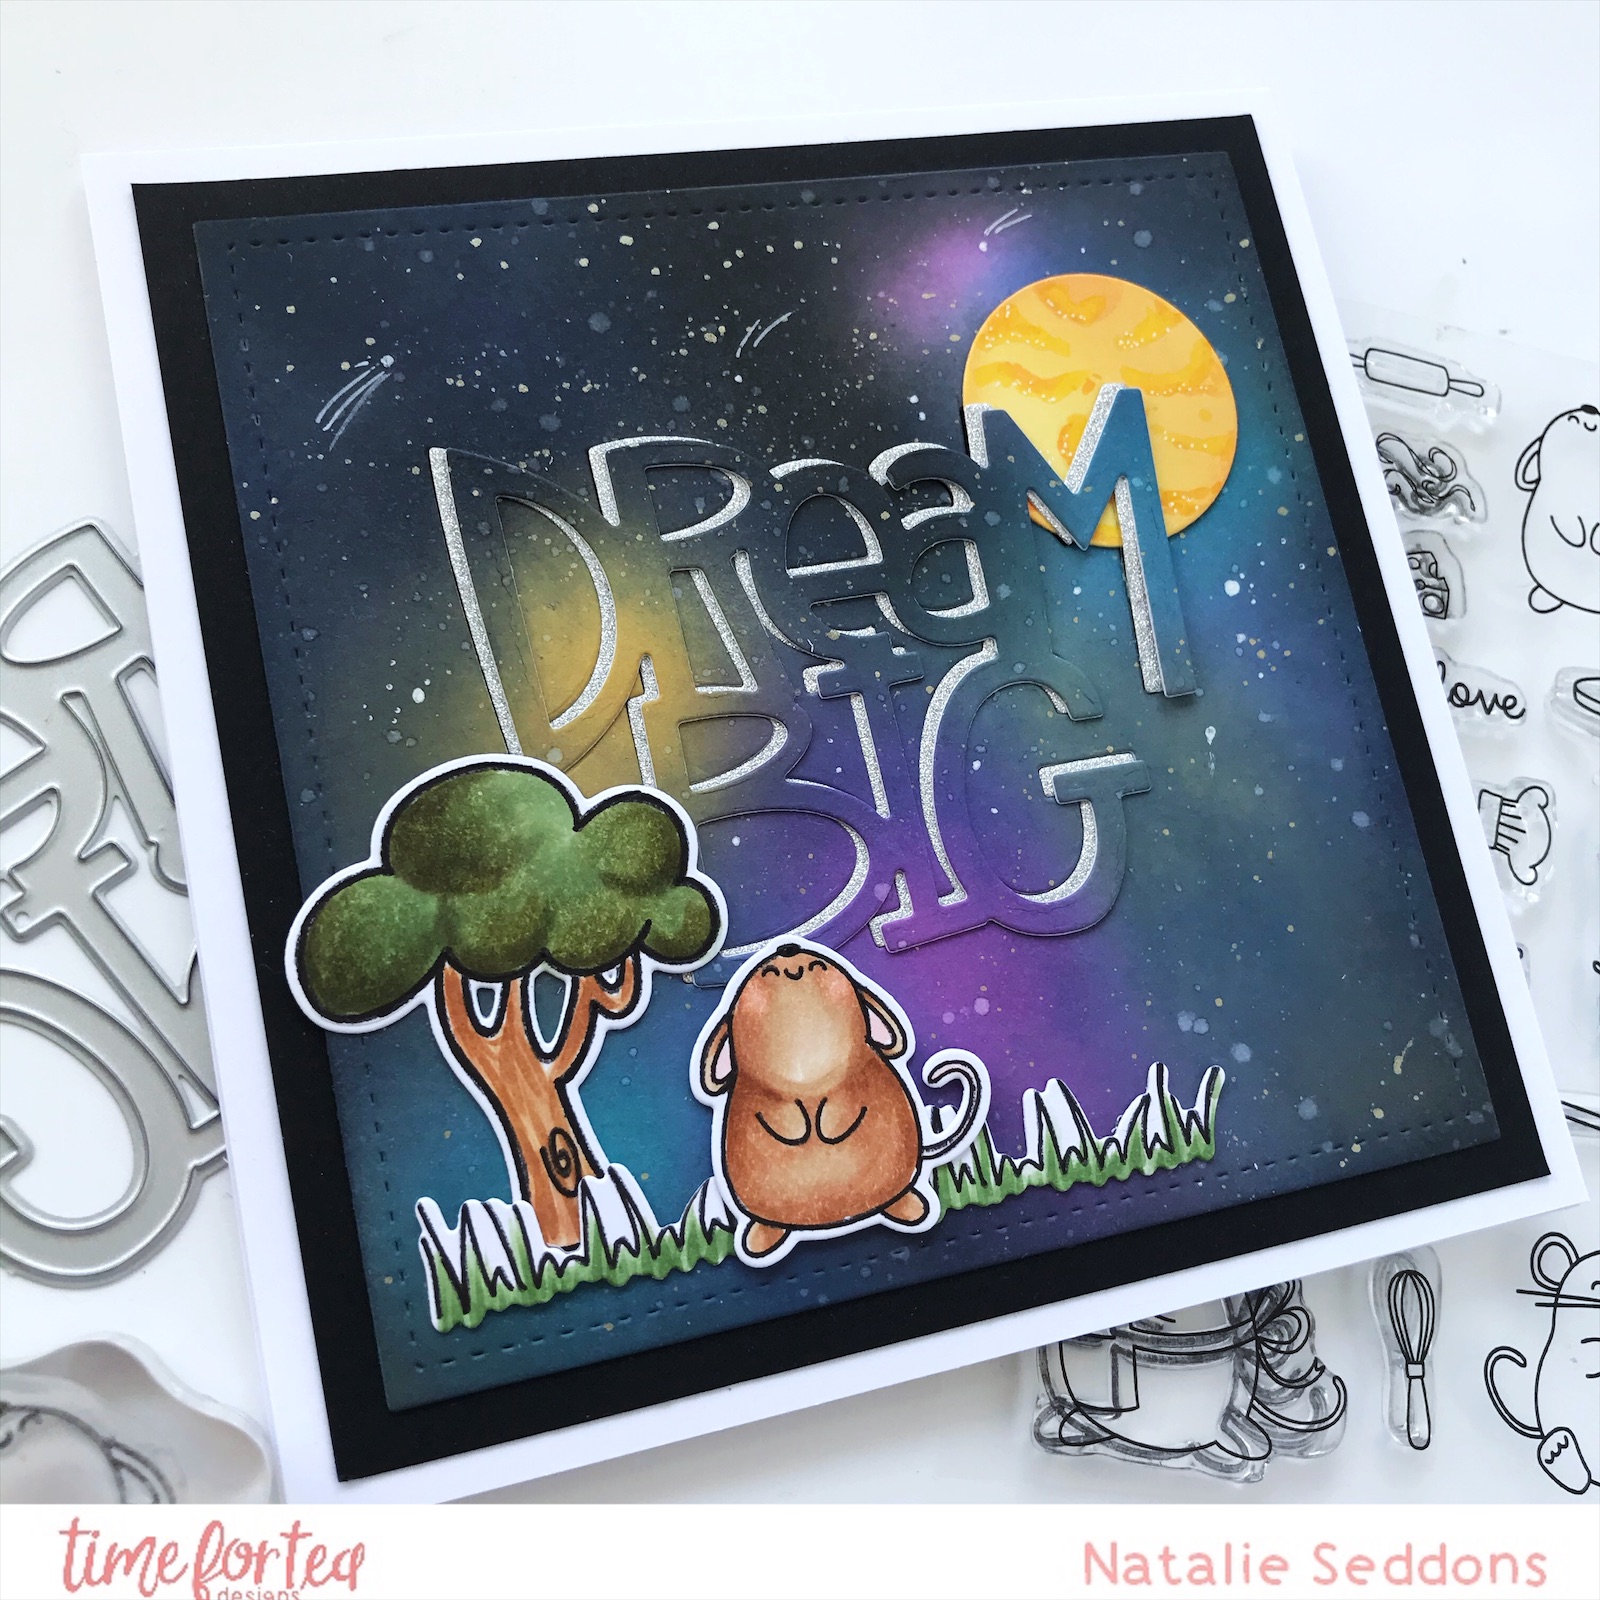
Hi guys hope your doing well! How much do you love the new release?! I absolutely adore these sweet mice in particular this cutie. As soon as I saw him I knew that I wanted to create a starry sky card with him looking up at a moon made of cheese. 
I started off by creating my night sky it’s such a fun technique. I used the second largest Quilted Square Nesting Dies to cut out a square from some Bristol Smooth Cardstock. I find this blends a lot easier which helps when you want to use lots of layers of colours. I laid down a base of violet, squeezed lemonade and peacock feathers distress oxide inks. Then when I had a fair bit of coverage I went over the top with some chipped sapphire and black soot distress oxides going lightly over the colours so they are still showing through and a bit heavier around the edges. When I was happy with my results I spritzed some water and dabbed it off then flicked some silver paint over the top. 
Making sure it was all dry I cut out the dream big sentiment in the centre and then cut it out in some  silver glitter paper. I mounted the galaxy background on some black cardstock and then Inlaid the silver in the dream big cut out. Then overlaid the galaxy dream big over the top but more to the right giving it a 3D effect. 
I cut out a circle for the cheese moon and stamped out my tree, grass and mouse and coloured them up with COPIC markers. Then stuck them down on the sky hiding the joint in the grass with the mouse. I added some more stars and a few shooting ones with my white gelly roll pen. Then mounted it onto my card base and my card was finished. I just love how versatile the mouse stamp is and so, so adorable it’s definitely turning out to be one of my favourites alongside the pandas. 


Saturday 18 April 2020

No one is Cheddar than you!


How cute is the new release from Time for Tea honestly I've had so much fun with the new Baked With Love set and the Say Cheese Cover Plate Die. My first card I made with the die had to be a big block of cheese but keep an eye out for the rest of my posts where I've mixed up the colours or used parts of it to turn it into other fun things like the moon and a rabbit burrow! It really is so versatile and I have made it a fun challenge with myself to find other things I can make with it.
So onto todays card which was really easy to create I started by cutting out the Say Cheese Die out of white cardstock then blending squeezed lemonade and spiced marmalade oxide over the top then spritzing it with water to add some texture. Using the piece I just coloured I used this as a guide to cut a back piece which I coloured the same way but using just the spiced marmalade, the darker colour will add depth in the holes. The yay was created with the hooray die which I cut out twice then coloured with the spiced marmalade and spritzed again with water.
I stamped out the mice and coloured them up with warm grey copics and the R11 colour for the cheeks and feet and cut them out with the matching dies. I love how the die for the little mouse at the bottom cuts out his little hands so he can hold the block of cheese.
Once everything was coloured and cut out it was time to put the card together but before sticking together the background I needed to add my sentiment I laid the two backgrounds on top of each other and placed them in my Misti this enabled me to stamp the sentiment perfectly in the hole.
Then I added some foam tape on the back of the background with the holes in and stuck it onto the base card and added my mice and mounted it onto my card base. It was such a simple card to make but still looks great! 


Saturday 11 April 2020

Create Pandemonium!


Hi guys I can’t believe Saturday is here already this week has flown by! 
I know it’s those Pandas again but can you blame me they are just the cutest. I’ve had this idea in my head for while now so it was nice to finally get it down on paper even though it looks nothing like I pictured. I’m really pleased with the final result though and I hope you like it! 
I started by cutting out the Quilted Square Nesting Dies and ink blending a sky on it with the sunny side up stencil. Then just blended some green on the floor to represent the grass. Once this was finished I used the smaller square to cut out the centre this is where we are going to lay out our scene. 
I stamped out lots of the bamboo and a few leaves and the two pandas. They are just simply coloured with warm greys to add some shading to the pandas and pink for the cheeks then a few bright greens for the bamboo. I cut them out with the matching dies and got ready to lay out my scene. 
I wanted it to look like my panda was climbing up the bamboo so stuck him down at the top and the other one off to the right munching away on his lunch I then used this to this help me find the best place for my sentiment. Which I just stamped it straight onto the card using a stamping block. Then I just placed the bamboo around them tucking some behind the bears to give the height without having to cut loads of bamboo out. 
Once this was all stuck down I needed to make the base of my card I cut out a square of card using the same die we used to make the larger of the squares. I then used this to measure out a square of fun foam this will pop out the outer frame you could use foam pads but this just makes it a bit more sturdy. I cut out the big square using my scissors then to cut the square out of the middle and to get the centre in the right place I laid the smaller die on top of the inked frame and fun foam making sure it was perfectly centred so as to not cut out the paper frame just the inner foam then run it through my die cutting machine. 
We only need the outside frame of the fun foam so I just saved the square for another project. I stuck the fun foam to the frame using read tape and then stuck this on to the base we cut out earlier. Doing it this way we can make sure the inside is stuck in the right place. I then just cut another square of card the same sizer and scored along the top about 5cms down this we will use to create the back of our card. I stuck some red tape on the very top above the score line and attached it to my card and that's it finished!


Saturday 4 April 2020

You Make Me So Hoppy!


Hi guys I can’t believe it’s Saturday already! For today’s post I thought I’d mix it up from my favourite Pandas and use those adorable Toads from the Toadally Awesome Clear Stamp Set. I got these a while ago and I’ve been itching to ink them up. I love making scene cards so I thought I’d make a pond scene, as always I decided which die I was using to make my base. I wanted some added interest though so used the Hello Stitched Rectangle Frame Dies and paired the two largest dies together to create a frame. I like that they are a slimmer rectangle so very on trend right now.
Taking the inner panel out I used the Sunny Side Up Stencil to create the clouds I wanted a light blue so just used the ink that was already left on my blender brush. To make the waves in the pond I cut out the smaller rectangle die again and used the Best Fishes Banner and Border Die set just lining up the wavy cut point at the right height I needed it to be making sure it was dead centre as not to cut the edges. I repeated this twice. This was then coloured with Peacock Feathers and Blueprint Sketch oxides and spritzed with water to add some texture.
Apart from the Bulrushes which are from the Moovelous set all the stamped images are from  Toadally Awesome. I wasn't hundred percent on my layout at this point so I stamped quite a few bulrushes and leap pads out and coloured them up with darker greens as I wanted the frogs to be a nice bright green to give some contrast. I added a few more pops of colour with the red ladybird, heart and bowtie then to tie in with the frogs coloured up the butterfly in yellows and oranges. 
I was originally going to add my sentiment at the top but it looked to cluttered up there so I stamped it out and cut it out with the co-ordinating dies and added it to the waves at the bottom. I think the layout worked really well its not too cluttered so doesn't distract the eye but there is enough detail to not to make it look like its missing something.
Anyways I hope you liked todays card crafting is definitely helping me stay calm in these uncertain, scary times. Let me know what you guys have been upto in the comments below. 
P.s Theres also a cheeky 10% off code for the Time for Tea shop if you want to buy some goodies just add T4TNATALIE in the voucher code section when checking out!