Saturday 30 July 2022

Get Whale Soon!


Hello Teatimer's I have another Whale card for you today. This time its a sweet Get Whale Soon card for which I went for a bright and colourful colour scheme. 
I began by cutting out the largest frame from the Metric Layering Frame Dies three times so I had one for the base layer and the other two I cut out the sand bottom and the waves. I ink blended these with distress oxides and layered them altogether. 
For my images I combined the Get Whale Soon stamp set with an older discontinued mermaid set. You could use the weed from Fintastic Friends too though if you have that. I coloured those up with Copic markers and added some finishing touches using Black and White Gelly Roll pens. 
I also heat embossed the sentiment onto black card and cut that out with the coordinating dies. I love that Time for Tea stamps have the coordinating dies to cut out the sentiments too. It just adds something extra to your card. 
After adding adhering everything together I added some birds in the top left corner and some pink dots using a gelly roll pen and that was my card finished up for today. 
I hope you like it and be sure to check back for some more inspiration from the design team. 
Also a nice added bonus if you want to purchase anything in the Time for Tea Shop you can get 10% off your order using code T4TNATALIE10. 


Tuesday 26 July 2022

Alpaca my Bags!


Hi I'm super excited to share my second card as Guest Designer for Heffy Doodle. I love the little llama's from the llamazing llama's Stamp Set and had this cute idea of them sailing away on a little cruise ship which I created using the new Boats and Barns Die
I started off by cutting out two rectangles sized 8.5 x 3.5 inches and blending Squeezed Lemonade, Dried Marigold and Pink Flamingo Distress Oxides onto the card. Finishing off with some spritzes of water which I dabbed off and then adding some splatters of colour using the same inks. On the second rectangle I cut out some waves which I inked up using Tumbled Glass, Salty Ocean and Mermaid Lagoon Distress Oxide inks again using the same technique of ink splatters and water spritzes. This time also added some splatters of white acrylic paint as well. I also cut out a little sandbank too using the base of the boat and just trimming it. The same technique was used for this but with Squeezed Lemonade, Dried Marigold, Tea Dye and Vintage Photo inks. Setting these aside to dry I stamped, coloured and cut out my llamas and accessories and the fish from the Sealy Friends Stamp Set. I coloured up them with copic markers finishing them up by adding some details using white and black gelly roll pen. I went with a rainbow colour palette for my fish for a bright summery look.


After everything was inked and coloured up it was time to work on the boat, I love how versatile the die is giving you the option to create a boat, ark or barn. Again I went for a nice bright pink to add a pop of colour against the kraft card. I love how the llamas sailing the ship with the big wheel, think they forget to pull up the anchor though! I wanted to create a chain for my anchor so threaded through some gold cotton tying it with a knot and gluing it behind the bottom of the boat. 


I cut out the rest of the pieces and adhered everything together. Popping the boat onto the base adding a bit of foam tape to the waves to add some dimension and tucking the sand bank underneath then adding all the rest of the llamas etc. 
I felt like it needed a little bit of something else when it was all adhered so added a few birds in the sky with a copic outliner and added some dots of colour with some neon gelly roll pens. 


The last thing to add was the sentiments and that was my card finished up. I have had so much fun guesting for Heffy Doodle this month and I hope you have liked my projects.

Saturday 23 July 2022

Have a Beary Good Day!

Happy Saturday Teatimer’s it’s DT member Natalie here on the blog with this super sweet bear card. I haven’t been well the past few weeks so needed a quick card for my post for today. Luckily when I colour up my stamps I always stamp and colour about three out of each image and then I have some left for another project later on. 

These sweet bears are from the Bears Picnic Clear Stamp Set. It’s such a sweet set with four bears a picnic basket some little ants and picnic food. I’ve used it many times and still love it so much! 

As you can see I added two of the same stamp but just coloured them up in different ways. As I wanted it to look like two friends having a Frappuccino in the park and then flying their kites way up in the sky. 

The background was pretty simple to make too the Stitched Slimline Slope Dies make for quick easy backgrounds. I just inked up the inside with different Distress Oxides to give the impression of grass and sky. Great for when your in a rush! I did layer the frame twice to add some depth and dimension. 


 For the sentiment I heat embossed white onto black card. I love this technique as it makes the sentiment really pop. Then to finish off my card I added some details with my gelly roll pens just adding some dots of colour in the sky and grass and then little dots on the cheeks and some shiny black noses. 

I hope you like my card for today and if you want to pick up any of the products you can get 10% off in the Time for Tea shop using code T4TNATALIE10 ❤️

Tuesday 12 July 2022

Heffy Guest Designer


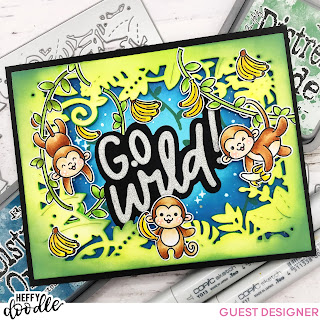
Hi it's Natalie here and I'm so excited to have been asked to be July's Guest Designer for Heffy Doodle. The critters are just the cutest and I had so much fun creating this Jungle at night scene card. 
I began my card by cutting out the Go Wild (A2) Frame Dies and ink blending them with a mix of Twisted Citron and Mowed Lawn Distress Oxide inks. I also cut the frame out of green fun foam to add some depth and create the impression of a deep, thick jungle. 


Next I needed to create the night sky so cut out a piece of white card to fit behind and layered on Chipped Sapphire, Uncharted Mariner and Tumbled Glass Distress oxide. To which I spritzed on water and dabbled it off and splattered on some gold watercolours to resemble stars. Once this was dry I added the vines using Rustic Wilderness Distress Oxide and the vine stamps from the Chimply the Best Stamp Set. 
S


I stamped out all the chimp images, the bananas and vines with memento tuxedo ink on to copic paper and coloured them up with copic markers. For the monkeys I used E37, E35 and E31 for the fur and then E31 and E42 for the faces adding R20 to the cheeks and ears and R32 to the tongue. Finishing them up with some White gelly roll pen dots on the cheeks and black on the dotted eyes.  I don't have the Chimply the Best Coordinating Dies so I fussy cut my images but I'd definitely recommend  getting the coordinating dies as they are a little fussy to cut and the dies would save so much time. 


For the main sentiment I used the big Go Wild die in the Go Wild (A2) Frame Dies using black card for the shadow part and Silver Glitter card for the letters. The black just makes it really pop and I thought the silver works well for the night sky look. 
When adhering everything to my card I tried to add some dimension by adding vines behind the lettering and underneath the frame alongside some of the bananas too. 
Once everything was adhered I added some dots and stars to the sky using the same white gelly roll pen and that was my card all finished up. I hope you enjoyed my tutorial for today be sure to come back soon for some more inspiration. 


Saturday 2 July 2022

You’re a reel star!


Happy Saturday Teatimer's I have a fun 3-D cinema card for you today. It was super easy to make and great for kids birthday cards or your movie loving friends. 
I cut out and coloured up the Movie Night Stamp using copic markers. Adding some finishing touches with a black gelly roll pen on the nose and some cute white dots on their cheeks. Once everything was cut out I could cut out the base. I used the Box Clever Die Set for this and cut it out of black card. This way I could figure out the height in which the seats needed to be. Adding the back one a little higher like it would be in the cinema.
It was at this point I realised I needed a pop of colour so added a lot of movie tickets in the background. Then at the sides I added some white panels which I stencilled the Popping Popcorn 6 x 6 Stencil using yellow and orange distress oxides, as you can see below.


To finish off the front I used the Purrfect Day Scene Builder Dies for the curtains and coloured them up with copic markers adding some little gold bands with a gold marker. Then for the sentiment I cut out another black strip and heat embossed my sentiment I didn't have any yellow embossing powder so coloured over my white with the same yellow copic marker over the top. I don't know whether this is good for your copics though so I wouldn't do it often and I scribbled off some ink on some scrap paper just in case. Then that was my card finished up. You can find all the products in the shop and get 10% off your order using code T4TNATALIE10.