Saturday 30 January 2021

Underneath the Stars!


Happy Saturday everyone are you making any Valentine's Day cards? I have a super sweet one to share with you today. I love how these sets work together, for my background I used the Scattered Hearts Cover Plate die. I coloured it up with Faded Jeans and Chipped Sapphire Distress Oxides. Then spritzed some water on to add some texture. I popped that onto some warm yellow card and added some glitter with the clear Wink of Stella brush pens. Then popped that onto some red card and straight onto my card base.
The tree is from the Autumn Scene cover plate die I cut it out and coloured it with a brown distress oxide these really make the embossed details pop. I needed some grass to ground my kitties so cut out some using the Standalone Landscape die I cut out on large piece then cut it out again lower on the same piece. 
The cue kitties are from the new Smitten Kittens I just love how their tales are curled together to form  a little love heart. I used e99, e97 and e95 for the ginger kitty and w7, w5 and w3 for the grey kitty.  I felt like it needed a pop of warmth at the bottom so coloured up the picnic blanket from the Plaid Background Clear stamp set.  
For the sentiment I cut out the love die from the Circle of Love Nesting Die set and stamped out I and Mew at either side. 
I just love how this one came out and I hope you did too, I can't stop colouring up these cute kitties so be prepared to see lots more cards coming up. 
Don't forget if you want to buy anything in the shop you can get 10% off using code T4TNATALIE10


Thursday 21 January 2021

Sneak Peek Day 3!


It's the last day of peeks and what a cute release, hard to pick a favourite eh! Today we are sharing the Happy Mail Critters stamp set, it comes with the sweetest critters and a great selection of accessories. 
I just love this sweet kitty and it will work so well with so many other Time for Tea sets. I couldn't resist getting him to climb on the boxes to post his letter. 
I love the clean and simple look of this card the pinks really pop against the white. I used the Hello Rectangle Nesting Die set to cut out my base then stamped the Essential Stripes A7 stamp set to add with some Worn Lipstick Distress Oxide. This takes a while to dry so I popped it to the side whilst I stamped and coloured my images. I used the same Pink Copic tones to colour the letterbox and and accessories. I used a soft blue on the mail and some warm creams for the kitty. Then die cut them out and popped them on my card. I finished off with the sentiment from a great new sentiment set called Be Kind, Be You. 
For more peeks don't forget to watch Jo's live tonight and 8 and the new release will be live in the shop tomorrow. Don't forget you can get  10% off your order using code TIMEFORTEANATAIE10


Saturday 16 January 2021

Cosy Winter


 Happy Saturday everyone, design team member Natalie here. We have had a snowy few days so thought I’d make a cosy winter  themed card. This card was the first one of I’ve made of this kind, so it was very much guess work when I was making it. I love how it turned out though. 
I started out with the circle panel I cut out the Scattered Hearts cover panel die and then cut a circle out of it with the Circle of Love Nesting Dies. Which I ink blended with some Chipped Sapphire Distress Oxide ink and spritzed with a little water for a bit of texture. 
Then I cut out another two circles the same size one I layered underneath the hearts. The other I cut out the snow bank using the Landscape Stand alone Edge dies. 
The bunnies and mistletoe were coloured up using COPIC markers and die cut with the coordinating dies. I popped them on top and that was the topper finished. The rest of the front panel I dry embossed using the Treemendous Christmas stencil
To make the base I used a square card base and folded the front panel down the middle. I chopped the dry embossed panel to fit and popped it on and added my topper to the front. 


The card needed a stopper though to keep it open, I cut out the circle from the mini frame and banner die set alongside the little heart. I popped it just past the middle more towards the centre of the card just like this and that was my card finished up.
I really hope you liked it too and don't forget you can get 10% off in the shop using code T4tNATALIE10 

Saturday 9 January 2021

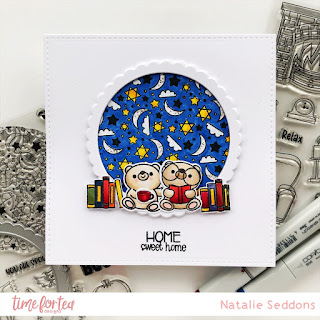
Home Sweet Home


Happy Saturday everyone,  It's been a long week and I'm so ready for the weekend. I'll be staying home and catching up some missed crafting after a our first week of home school. What about you? Are you creating this weekend?
This week I was sad I didn't get to use the Spooktacular Stamp set as much as I wanted to at Halloween so I tried to think of ways to stretch it. I love to stretch my stamps as we know they aren't cheap so I like to get the most out of them.
I decided to combine it with the bear and accessories from the Home Sweet Home stamp set and another of the bears from the Bearing Gifts stamp set. I love that the bears all work so well together.
I started by cutting out three squares from the Quilted Square Nesting Dies two will form our card base and the other I used for the front of the card. I stamped out all my images and coloured them up with Copic Markers, the sky I just coloured up really simply with no shading other than with the little moons. 
The bears I chose some soft browns for so that they would stand out against that dark sky. Then for the books I like to not use too many colours so it doesn't distract the eye and keeps the card more uniform. I used the same yellow as the stars and used a darker shade of blue of the sky and mixed in some rich reds, and oranges. Then using the same red for the little cup. 
Once everything was coloured up I Die cut them out for the books though I removed the shelf that was under them afterwards as I wanted it to look like they were stacked up on the floor next to them.
I also needed to cut out the scallop circle die from the Spooktacular Coordinating Die set again out of white card this will just frame the sky like a window but still be quite subtle.
I popped everything on my card and then finished it up with the Home Sweet Home sentiment and that was my card finished up. I hope you like it and don't forget you can get 10% off in the shop using code T4TNATALIE10
Have a lovely weekend and I'll see you again next week!

Saturday 2 January 2021

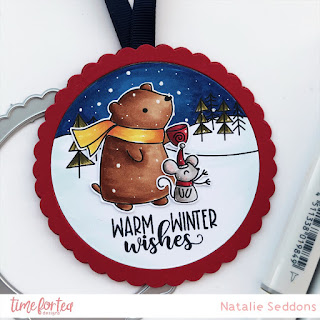
Warm Winter Wishes


Happy New Year everyone, I hope you have had a lovely holiday period despite the difficult times. I have a super sweet winter themed tag to share with you all today. The tag was pretty quick and easy to create. I used the scalloped circle die from the Spooktacular coordinating die set, I just cut it out twice and stuck it together back to back as the middle circle cuts out making sure to stick my ribbon in between.
It works really well as it fits the snow globe stamp from the Cosy Winter Stamp set perfectly, I found its much easier if you stamp first then cut. I coloured it up really simply with copic markers the trees are really small so you don't need much shading. For the snow I just added some very light blue shading to give it some depth.
The mouse and bear I coloured again with my Copics adding a little pink to the mouse's cheek to give them a rosy feel. I die cut them with the Cosy Winter Coordinating dies and popped them on the tag. Then I popped my sentiment on the bottom this is actually from the Winter Wishes stamp set I just love the cursive alongside the capitals. 
I look forward to seeing your creations and don't forget you can get 10% off in the shop using code T4TNATALIE10