Saturday 19 February 2022

Happy Mail, Hugs Enclosed!


 Happy Saturday Teatimer’s, have you had a good week? You might have seen this cute card during the blog hop last week, so I thought I’d share with you all how I made it. 

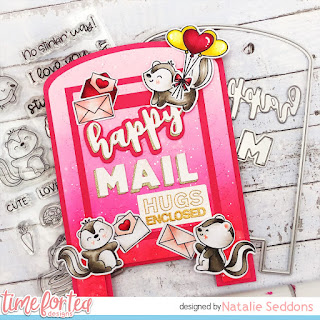
I finally got to use the Happy Mail Gift Card Holder Die Set. I didn’t use it as a gift cardholder though, I just used it to create a fun shaped card base. I wanted some texture on my card so cut out the Dotty Hearts Cover Plate Die and ink blended Abandoned Coral, Picked Raspberry, Kitsch Flamingo and Spun Sugar Distress Oxides over the top to give and ombré look. Finishing off with a few splatters of water to give some texture and some splatters of gold water colour paint.

 Setting that aside to dry I stamped cut out and coloured up the skunks from the Stinkin’ Cute Stamp Set. I coloured them up with COPIC markers and added some finishing touches with white gelly roll pen. The letters are from the Happy Mail Critters Stamp Set and the Be Kind Be You Stamp Set which also contains the hugs enclosed sentiment (which I stamped and heat embossed in gold) then the balloons are from the Smitten Kitten stamp set. I really do love to mix and match my sets! Once all the colouring was done I could began adhering my card together.

I cut out the biggest of the two mail box dies the larger rectangle and the letter box die out of hot pink card. Then taking the Dotty Hearts panel I cut the smaller mail box out of that and to save my card being bulky and time I cut out the smaller rectangle in the middle. Then layered everything on top of each other as you can see the larger pink rectangle covered the hole.

Before adding my critters I needed to make the rest of my sentiments I used the Happy Mail die from the Happy Mail Gift Card Holder Add on Die Set which cut out in gold and white and layered on top of each other to create a shadow and used the same hot pink for the happy bigger shadow. 

Then I just adhered everything together using foam tape on the critters to give some added depth and dimension. To make the card base I just cut out the bigger of the two mail box dies from white 360gsm card twice and scored one of across the top about 2cm down and added double sided tape above the line and attached my card together. Then all was left to do was adhere the top and that's my card finished up. I hope you like my card for today it's super fun and great for just sending happy mail to a friend. You can find all the products in the Time for Tea Shop and get 10% off any orders using code T4TNATALIE10. Have a great weekend and I will see you all next week. 

Saturday 12 February 2022

Valentine’s Blog Hop!


Hello Tea Timers!! We have some great news for you today! To celebrate Valentine’s day we are running a sale on a range of products in the T4TD store and we can tell you they’re all so adorable! 


To celebrate we’ve organised an Instagram and Blog Hop giving you a chance to win one of the two £20 vouchers to spend in the store. Here is how you can join in:


* Leave a comment on this post and every DT’s blog post


The hop will close at midnight February 14th UK time. The winners will be chosen at random from both Instagram and blogs and the winner will be announced on the T4TD Instagram & Blog on February 15th.


The next stop on the hop is: 


Hop order:


T4TD

Natalia

Miki

Natalie

Claudia

Jane

Silvia

Kitty

Jayne

Annalisa

Lyndsey 

Vicki

Tasha


Best of luck and remember to check out the DT’s Instagram pages for more chances to win!

Saturday 5 February 2022

Treat Yourself!


 Happy Saturday Teatimer’s have you had a good week? I have a super sweet card for you today. I was feeling the pink this week can you tell 😂 

I began by cutting out the A2 Stitched Cover Die and ink blending Festive Berries, Picked Raspberry, Kitsch Flamingo and Spun Sugar Distress Oxide ink. Then spritzing it with water and adding splatters of the same colour inks to give it some texture. Also adding some gold glitter paint splatters.

Setting this aside to dry I stamped out the Hello Cupcake Stamp Set and coloured it up with copics and cut them out with the coordinating dies. Once they were cut I added some finishing touches with white gelly roll pen. 

I popped them onto the card base adding some dimension with foam tape and double layering the mice so they stand out more. For the sentiment I used the new Bold Sentiments Stamp Set, which I heat embossed with the neon pink wow embossing powder. I love this colour so much it’s super fun. I cut the sentiment mount with the coordinating dies and used the die to cut out some fun foam to add some dimension. I find the fun foam great for fiddly or intricate shapes you can just cut it out with the die and it fits straight underneath. 

After adhering everything I added it on a black card base and that was my card finished up. I’m really loving this colour scheme at the minute it’s perfect for those Valentine’s cards coming up too! 

Happy crafting and have a great weekend and if you fancy some cheeky shopping you can get 10% off in the Time for Tea shop using code T4TNATALIE10 ❤️