Wednesday, 14 October 2020

Too Cute to Spook!


If anyone knows me they know how much I love Halloween crafting so I was so excited to see these cute new Halloween stamps from the new Time for Tea release. I couldn't resist making some cute Halloween decorations I used the new This is Your Day Die to create a cute banner and then made a fun tag with the coordinating dies to the Halloween stamp set. 
As you see I stamped out and coloured up a lot of pumpkins, ghosts and mice I find this a good way to get things started so I could play around with layouts. The pumpkins and Halloween stamps are from the new Spooktacular stamp set and the mice are from the Treat Yourself stamp set. 
I cut out six of the banners and two of the scalloped circles out of a thick black cardstock. I blended some purple clouds on all using the Scene It stencil and splashed on some gold splatters for added interest. 
Then popped on my my little scenes for the banner I placed twine in between the back and front pieces and the tag some pretty silver ribbon. 
As you can see there are still plenty of pumpkins, critters and ghosts left over so be prepared for some more Halloween fun ❤️
Don’t forget you can get 10% off your Time for Tea order using code T4TNATALIE10 


Saturday, 3 October 2020

Home Sweet Home!


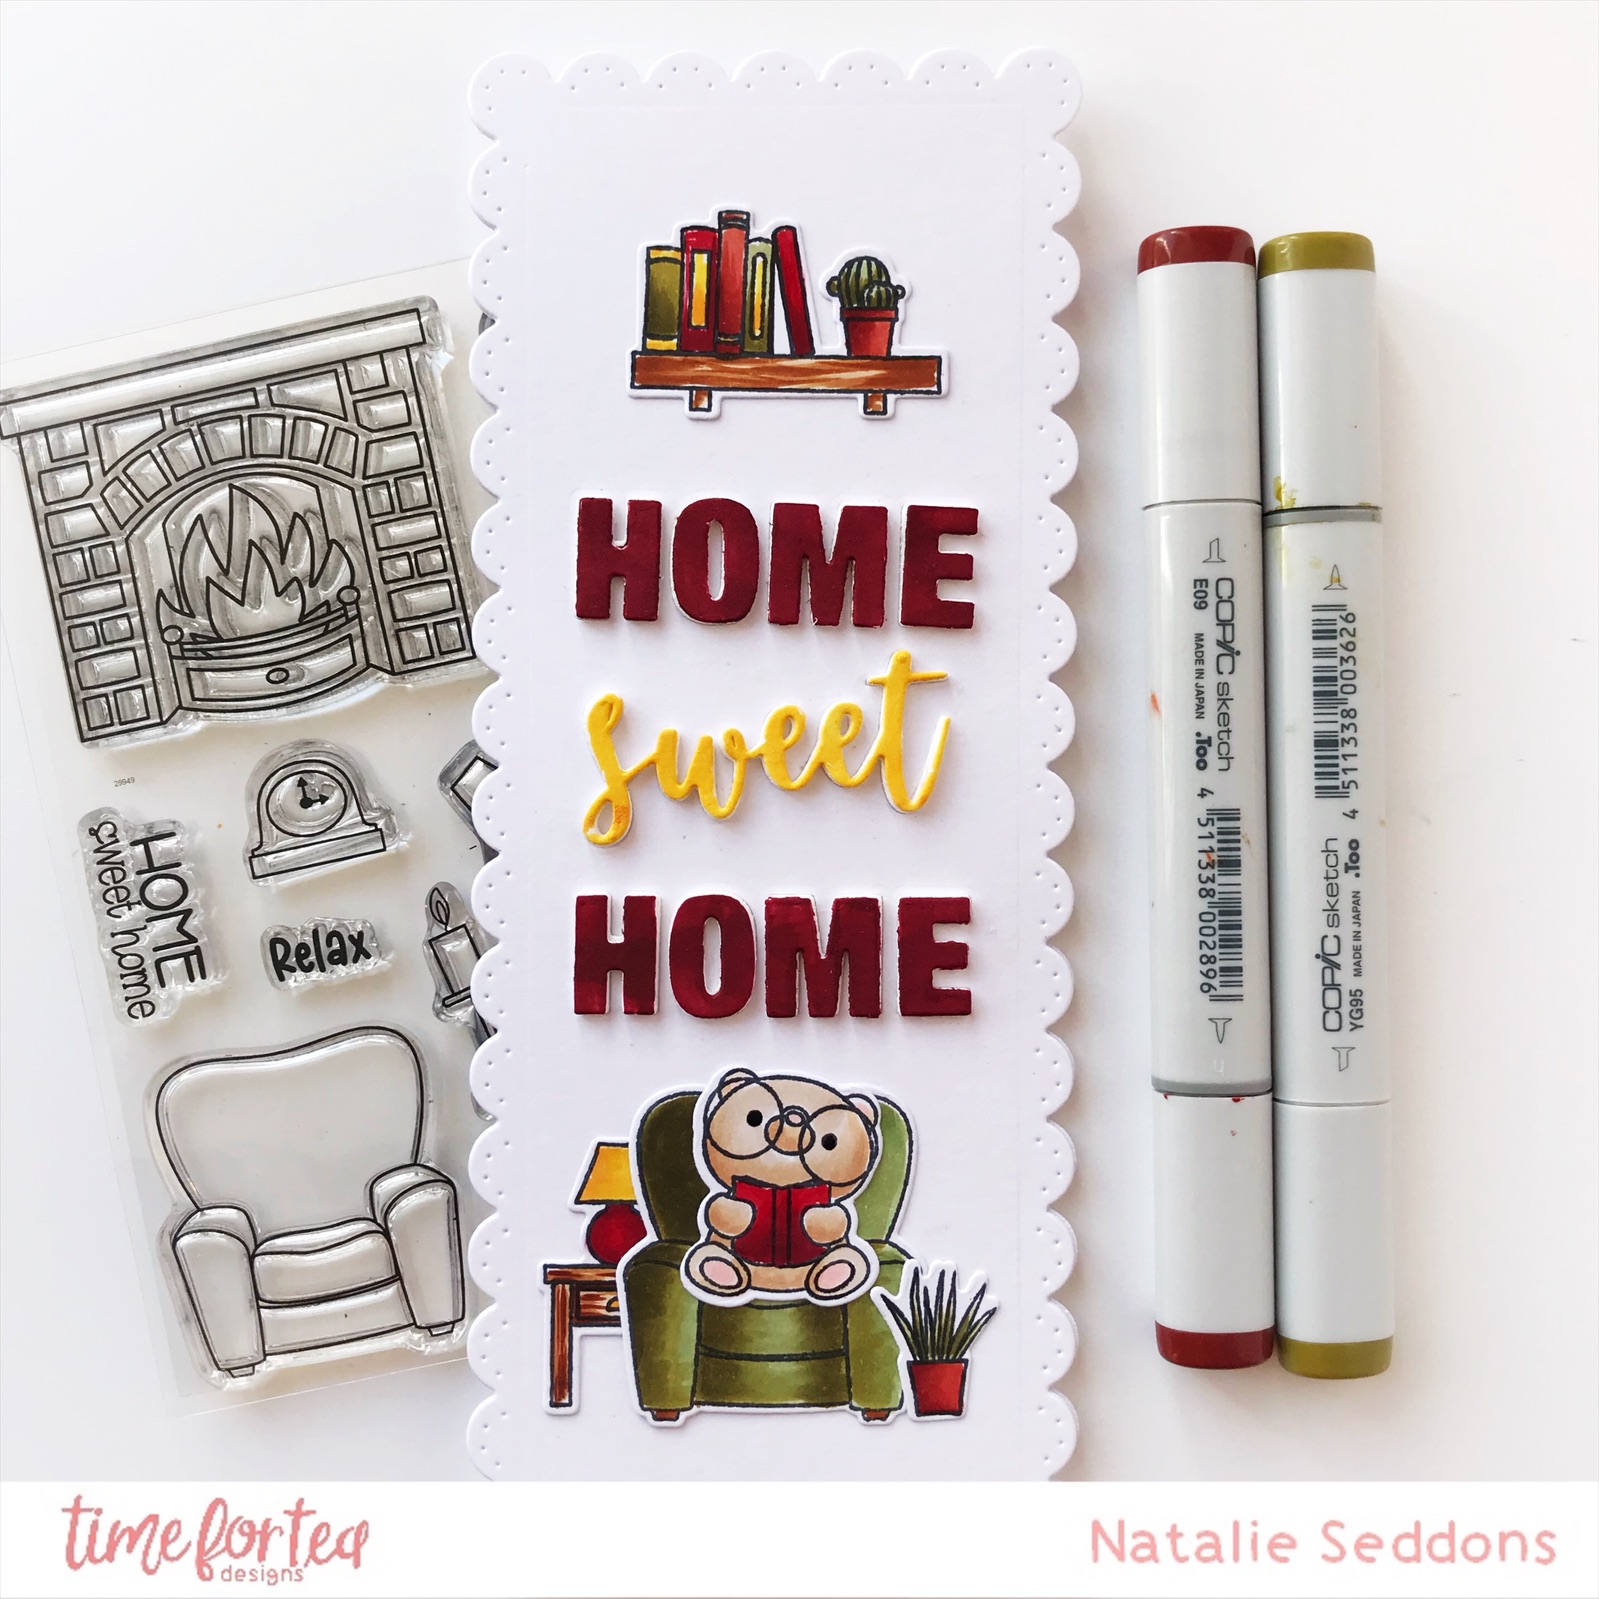
Morning all so what did you think to the new release? What's your favourites? It's another cute one right! I've been an avid reader since a kid so as soon as I saw the bear cosied up with his book I was in love. I love that that the set comes with so many accessories so you can build a home scene around him.
For my card today though I opted for a clean and simple look and choose some rich Autumn colours for the colour scheme. I wanted the new Home Sweet Home sentiment to be the focus point of the card so didn't want to add too much to detract from that. 
I began by cutting out three slimline scallop shapes out of white card and on one I cut out the home sweet home sentiment making sure to keep all of the pieces. I cut out another one out of fun foam too. I coloured in the sentiment using some rich reds and yellow just to give it a pop of bright colour. I layered the cardstock I cut out the Home Sweet Home from over the top of one of the other slimline card pieces. Taking the fun foam Home Sweet Home I stuck it into the Home Sweet Home I cut out earlier and stuck the sentiment I coloured on top, this gives it some height and a bit of added detail.
I coloured up my bear and scene using some rich autumn colours sticking to a small range of colours and cut them out and popped them onto my card. To make my custom base I took the last slimline scallop scored one and a half scallops down along the top and stuck it to the back of the front using some double sided tape. I hope you like it and I hope this gave you some inspiration for some weekend crafting. Don't forget you can get 10% off in the Time for Tea shop using code T4TNATALIE10 


Friday, 25 September 2020

Let's have Coffee!


Hi everyone the weekend is here already! I am absolutely loving clean and simple cards at the minute especially now I'm back at work so less crafting time. This one was inspired by Michelle Short who guest designed for us for the August release I loved the texture and detail she achieved using the sun die but with white on white. It gives added interest but doesn't take away from the main image.
I started like I always do and cut out the Sunburst Cover Plate Die I then used this to measure out my card base. The two hexagons are from the Bee Happy Hexagon Stitched Nesting Dies and are one of my go to dies. They have been so useful in framing small images and again they have the added texture detail but being in white don't detract from the image. I popped the smaller frame up with foam tape as well to give it some extra height. 
The little critters are from the All Occasion Critters Stamp set that was in the August release too they are so sweet. They didn't really take much colouring as they are only small. I used my go to my beloved Copics and cut them out with the matching dies. I popped them onto the top hexagon and stamped on my sentiment and stuck everything together. 
It's such a great design for when you need a quick card but still want it to really pop! I hope you like it as much as I do. Have a nice weekend and don't forget you can get 10% off in the shop using T4TNATALIE10 


Saturday, 19 September 2020

Cute Hello note cards!


Happy Saturday everyone it's Design Team member Natalie here and I have some adorable note cards to share with you today. I made two variations but I feel like you could make a whole series of them. These I made quite a while ago so have quite bright summery colours but some rich autumn colours with the Woodland critters stamp set would be so cute. 
I started out by cutting out six rectangles using the Hello Rectangle Stitched Nesting Dies four I stuck together at the top to make two card bases and the other two will be our toppers. Taking the topper pieces i stamped out the Essential Stripes off centre and more towards the top so it's more aesthetically pleasing. I like the softer colours as it doesn't distract from the soft coloured images. I stamped my stripes with Distress Oxide so made sure they were fully dry before cutting out the Hello die and also made sure I kept all the tiny pieces like the inside of the e and o. 
The cute raccoon and bear are both from the All occasions critters stamp set which I coloured very simply as they only small with Copic Markers. I cut these out with the coordinating dies and also cut out the die shape out of some fun foam I like using this as it gives a cleaner look than foam tape. Using the foam tape again I also cut out another hello die.
To put the card together I stuck on the topper to the base of the card then stuck the foam tape hello in the gap where I die cut it from then stuck on the hello I cut from the striped background on top and added the stripped pieces from the inside of the o and e. The critter was added in the same way but i just chopped off a bit of the fun foam where it meets up to the letters and that was my cards finished.
I hope you like them and as always don't forget you can get 10% off  in the shop using T4TNATALIE10 
Have a great weekend everyone and I will see you all again next week!


Saturday, 12 September 2020

Missing you Pig Time!


Happy Saturday everyone it’s Design Team member Natalie and I have another card to share with you all. 
I love finding ways to stretch my dies so I had to turn that fun windmill into a little Piggy house. It was a quick card to make with not too much colouring. The base of my card is cut from two of the larger quilted square nesting dies I just scored one at the top all the way across about 1 cm down and then added some double sided tape and stuck them together . Then I cut out the one smaller to make the card I used the Sunny Side up die to stencil the clouds in a soft grey to look like a stormy sky. Then splattered some dark grey for some added detail and stamped out some birds and the sentiment. The Picket Fence is cut from the Windmill Add on die set and I just added some shading with a cold grey copic marker. The Piggy house I cut out the top bottom and door out of white card stock so that it would be a bit sturdier and my paper was really thin then just cut them out again from some pretty paper and popped it all together. Patterned paper is such a quick easy way to do this and look so pretty. 
The grass is die cut with the new Landscape Edge standalone die set I love this set as most of my cards are scenes it adds fun details and layers. I coloured it in with some green oxide inks and added a splash of dark green for some extra detail then coloured up my piggies. I wanted an extra muddy puddle too so I stamped out the pig with the umbrella again but masked off the pig and wiped away the foot then just filled in the line I could have drawn my own I guess which might have been easier but I must have been feeling lazy. Then I popped all my card together it really didn't take long other than deciding how I wanted things laid out. I hope you like my card and don't forget you can get 10% off in the shop using code T4TNATALIE10  . Hope you all have a good weekend!


Hogs and Kisses Coordinating Dies


Saturday, 5 September 2020

Hang in There!


Happy Saturday everyone its Design Team member Natalie here sharing some more inspiration with you. Today I have a cute bunny card for you using the new Up, Up and Away stamp set. 
The slimline dies are perfect for this set creating a long card for your scene giving the impression your bunnies are flying high into the sky.
I used the slimline die to cut out three pieces of white card stock this is creates the base of the card and the top layer which I used to make my design on. I used the Sunny Side Up Stencil to create the cloud background using a mix of Picked Raspberry, Worn Lipstick and Dusty Concord Distress Oxides. I also added some splatters of the same Oxide inks alongside gold paint and white gelli roll dots.
It's a real quick and easy background but looks so stunning.
The bunnies were pretty quick to colour too I used warm greys for two of the bunnies and then a colour  of browns for the other one. I tried to stick to a few colours so it wasn't too distracting and cut them out with the coordinating dies and popped them on the background I created. 
To create our custom card base I scored the top of one of the slimline pieces we cut earlier around one and a half scallops down then added some red tape and attached it to the other one this creates a top folding card. Then all was left to do was stick down the front of the card and it was all finished!
I hope you enjoyed my card for today don't forget you can get 10% off in the shop using the code T4TNATALIE10  


Saturday, 29 August 2020

I think you're kind of a Pig Deal!


Happy Weekend everyone hope your all well and loving the new release!
I have a fun clean and simple card for you today on the blog today using the new Hogs and Kisses stamp set. I love the white on white with the die cut background it gives it a bright, clean look whilst making the image pop. 
The die cut background is the Sunburst cover plate die from last months release its super versatile and I've used it so much I just popped it on a card base and cut the card base down to fir the size.
For the topped I used the Circle of Love Nesting dies and cut out two circles one I inked up some grey clouds using the Sunny Side up stencil. The other I cut out some grass using the new Landscape Edge standalone die and I ink blended with some Twisted Citron Distress Ink. The cute little pig is just so fun I can see me using him so much, I coloured him up and stuck my topper together and popped it on the base then added my sentiment strip and that was my card finished up.
It was super quick to make but still looks striking I hope you liked my card for today and don't forget you can get 10% off in the shop using code T4TNATALIE10 


Saturday, 22 August 2020

Sneak Peek Day 5!


Hi all its Day 5 of sneak peek week and I hope your loving the new release as much as we are!
Today's peeks feature the Windmill Builder Die set its a super fun die that's very versatile you can make the sails move by adding a brad, just keep them still like I have here or I've also left them off altogether to make a house for my piggies.
The super cute bunny and sentiment are from the Up, Up and away stamp set as soon as I saw the bunny I had to make a card with him taking a ride on the sails. The sentiment just seems perfect for right now too so great for sending to family and friends to let them you are thinking of them. 
Again the grass die is from a new set I was hoping Jo would bring out a die set like this and she didn't disappoint it works perfectly with our critter sets for all your scene card needs. There's more too those cute little flowers in the grass they are from the new Windmill Add on Dies so even more accessories to add to your scene and you know I love my scene cards!
It's a big release again and it won't disappoint if you want to see the big reveal you can join us for our Facebook live Monday 8pm GMT. 


Saturday, 15 August 2020

Mew are the Best Gift of All


Happy Saturday everyone its Design Team member Natalie up on the blog today sharing my Christmas morning scene card. I love how there's lots of detail going on but the crisp white background gives it a clean and simple feel. 
I started by cutting out three squares of white card stock using the stitched square nesting dies then in one cut out a smaller square using the same die set for the window. On one of the other squares I inked some blue clouds using the Sunny Side Up again stencil and added some darker blue splotches for some added detail. The sun is cut out of the gorgeous Rainbow Brights Essentials Paper Pad using the Sunburst Cover Plate Die. 
As you know I don't like to use too many different colours on my cards I say it's because I find it more aesthetically pleasing but I also find picking colours really hard so find it easier to stick to a few. I like the colour coordination in the presents too and you can always add texture or pattern with a gelly roll pen. I find also helps to quicken the colouring progress especially if you have a production line going on. So I coloured up my cat and presents from Mew are the Best Gift of All in a range of reds, blues and greys and die cut it out. The Christmas Tree is from the Warm Winter Wishes stamp set I didn't add any extra baubles so as I thought there was a lot going on in the scene already and wanted to keep the attention on the cat.
Then I added the sentiment to the card and layered it all together using the third square we die cut at the back of the card base and that was my card finished. I hope you like it!


Saturday, 1 August 2020

The Greater the Storm the Brighter the Rainbow!


Morning all well its been a full week already since the new release and it looks like your all loving it as much as we are! I love how everything works so well with each other I combined the Storms don't last Forever and the Grateful for You Landscape stamp sets for this sweet card.
I started out by cutting out two large circles from the Circles of Love Nesting Dies and two circles the next size down. Using the smaller circle I ink blended some clouds using the Sunny Side up Again Stencil and Pumice Stone Distress Oxide ink. I finished it off with some splatters of Iced Spruce Distress Oxide then I set it aside to dry.
Using the other small circle I cut I stamped the Grateful for You landscape image on and coloured up with Copic markers. I fussy cut it out right on the line and chopped off some of the other elements just keeping two of the mountains and one tree. This just gives it a different look and gives more room for the Rainbow in the background.
The rainbow I stamped out using Worn Lipstick and Picked Raspberry Distress Oxide then the middle arch I heat embossed with Gold embossing powder. The cloud is die cut with the cloud die I just didn't stamp it and the sun is from the Grateful for You Landscape set. 
For the sentiment I added some Worn Lipstick distress oxide on some card then stamped straight on top and die cut it out. Then all was left to do was stick everything together and pop on the back of the card the second larger circle I cut and  my card was finished.