Saturday, 27 March 2021

Spring Sale!


 Happy Saturday everyone did you see the Spring Sale in the Time for Tea shop yet? If not be sure to check it out there’s lots of fab dies to be had including this wavey hello sentiment die. Just be sure to add HOPPYSPRING21 in the promo codes as the checkout or if nothing in the sale takes your fancy you can still use T4TNATALIE10 to get 10% off your order you just can’t use both offers combined. 

There’s a great selection of dies in the sale which are perfect for creating fun scene cards and you know that’s my favourite kind of card making. 

Every so often though you need that quick last minute card though don’t you! This one was such a simple one to make I used the Slimline Scalloped Trio Circle Nesting Dies to cut out the white panel. Then layered behind a panel I had stencilled using the Zigga Zigga stencil using Distress Oxide inks. 

The Wavey Hello die I cut out twice once out of hot pink card and once out of white card which I offset layered on top of each other for some added interest. 

The critters are from the Bearing Gifts and the Happy New Year Critters stamp sets which I coloured simply using COPIC markers. I finished up by mounting the base on the same hot pink card stock and then popping onto my card base. I hope you enjoyed my card for today and don’t forgot to share your makes in the group and on Instagram we love seeing them so much! 

Hope you have a great weekend,  Natalie! 

Saturday, 20 March 2021

Hello Sunshine!


 I can’t believe how fast the weekend has come around again! It’s been a busy week in the garden getting it ready for summer so I thought I’d mark the occasions by bringing in some warm feelings with my latest card. Watermelons always remind me of our lazy summer holidays in France my little man always insists on picking the biggest one in the shop and carrying it all the way around. So that’s where my idea came from, I’m seriously regretting not adding a little slice of watermelon in the little mouse's paws though maybe next time! 

I started out by cutting out the Oval Scalloped Nesting Dies twice out of 360gsm white card stock. I scored one at the top about a cm down and then stuck them together to create my card base. 

To create the watermelon I cut another one out of the same white card and lightly blended worn lipstick distress oxide onto it. Then using the Zigga Zigga stencil I went over the top with Picked Raspberry distress oxide to add some texture. I also spritzed on some water and dabbed it off with paper towel to add more interest and splattered on some back soot distress oxide to represent watermelon seeds. 

For the green I cut out the frame die out of white cardstock and then out of green fun foam so I could add some depth. I find the fun foam much easier when it’s an awkward shape as it’s just one cut from the machine and fits perfectly. I used twisted citron and a tiny bit of mowed lawn to add some shading on the edges. 

Next I needed to add my sentiment and little mouse. I used the Hello Sunshine Sentiment Die and cut it out using black card stock and used the negative die cut to get them placed perfectly. The little mouse is from the Treat Yourself Clear stamp set I used warm grey Copics to colour them in. There wasn't much shading involved as they are so tiny. I just finished them off with a little R11 in the ear, on the cheeks and for the nose. I cut them out with the coordinating die and popped them on my card. 

After sticking everything down  I finished it up with some Black Nuvo drops and that was my card finished up. I hope you enjoyed my tutorial don't forget if you want to buy anything in the shop you can get 10% off using code T4TNATALIE10 

Saturday, 13 March 2021

Happy Mother's Day!


This week seems to have flown by I can't believe how fast the weekend has come around. It's been a quiet week with the boys being back at school and work so extra crafty time for me! Did you get your Mother's Day cards finished up? If not I have another quick and easy card for you today. 
A great way to get more out of your dies is to turn them into stamps, its super easy I just cut them out of fun foam and stuck them to my stamping block with some double sided tape. I used the new Spring Blooms Dies to create my background.
If you want to use different colours with the same stamp its probably best to cut one for each colour. I just stuck to one colour per stamp so just cut out one of each. 
I cut my base out of white 360gsm cardstock using the large rectangle from the Autumn Cover Scene Die and stamped my images straight on top. I used Worn Lipstick and Dried Marigold Distress Oxides for the flowers and then Bundled Sage and Mowed Lawn for the foliage. 
Using the fun foam doesn't give a crisp stamp but I like the distressed look I think it adds extra interest to the card. I didn't follow a pattern just tried to even space the flowers and fill in the gaps with the little leaves.
I didn't want to hide too much of the background so I kept my sentiment small and simple. I heat embossed the Happy Mother's Day stamp from the Mum and Dad clear stamp set onto a small rectangular piece of black cardstock. I wrapped some twine around the card and then popped the sentiment over the top using some foam pads. I finished it off by mounting it onto some pale pink cardstock and popping it onto my cardbase. 
I hope you like my card if you want to purchase anything you can find them in the Time for Tea shop and if you pop in code T4TNATALIE10 you can get 10% off your order. Hope you have a great weekend and thanks for stopping by.


Brave Spirit...


Hello Lovelies I hope your all well, its my first blog post as official design team member for Tracy and my first ever step by step tutorial so no pressure lol!

The Angels of Love and Light are so beautiful and I particularly love Believe she just looks so serene and peaceful. I've been wanting to colour her up as though she is floating away in a bath full of bubbles since I first saw her, so it was great to finally put pen to paper.


I began by creating my background I cut out a piece of 360gsm cardstock using a slimline die. Then blended Squeezed Lemonade, Kitsch Flamingo, Wilted Violet and Tumbled Glass Distress Oxides on there. There was no method to it I just tried to get an even amount of colours on there. Once I had an even coverage I used some clean water to spritz on top then left it for a couple of seconds before dabbing it off. The ink will react with the water and the colour will lift off. I finished the background off splattering each off the colours onto the card. I just love the texture it gives the background but its still really subtle.


The next step was to colour up my girl there I used E31, E34 and E35 on her hair I didn't end up using the E37 in the end as I decided to go for lighter hair. I flicked the darker colours at the edges and went lighter in the middle to add a highlight. Using the flicking technique helps get the texture of hair and adds some depth. For the skin I used E31, E55 and  E51  I added the darker of the colours to the hairline and cheekbones, a little spot under the nose and for the dimple of the chin. Then blended it out think about it like your contouring your make up to help where to put the shading. Once the colouring was done I fussy cut her out. 


Laying her on my card I could see how many layers of bubbles I needed, I coloured them in the same shades as I did the background. Again there was no method I just kept the pink, yellow and purple on one side and then the blue all over. 


Once all the bubbles were coloured up I could stick everything down. I layered one set of the bubbles over the girl and the rest underneath. Once they were stuck I flipped the card over and chopped off the edges so that it all lined up neatly. Then the extra ones I carefully cut and stuck randomly towards the top of my image after stamping my sentiment. I finished the top panel off by adding some more smaller bubbles using a white Gelly roll pen and adding some glitter with a clear wink of stella brush pen. I mounted it on white cardstock that I cut using the larger slimline die out of the set using white fun foam to add some depth. 
I hope you liked my first project and I cant wait to see all of your creations.


Saturday, 6 March 2021

Mother's Day Card


Not long to go till its Mother's Day have you got your card made up? I have some inspiration for you if not using the new Spring Blooms kit. Again I love how well the Valentines release combines with this one. It's quite a quick card to make as there's no colouring involved just some simple die cutting. I kept my colours quite simple pink obviously for the hearts a little subtle lilac and a pop of contrast from some greens and yellows. 
I made a card base slightly larger than the Lots of Love Horizontal Cover Plate  Die and popped some pink card on top then layered on the horizontal hearts die cut out of white. I re-cut the same die then out of pale and dark pink. The hearts were then randomly layered onto the card base there was no pattern but I tried to make it even. 
The big die cut sentiment is the new Got it from my Mama die I cut out the back in the pale pink and some white fun foam and layered them together. The sentiment was cut using the out of the same darker pink card and layered on top. It cuts in several pieces but it's pretty easy to line up. 
Once this was all put together I could use it to figure out the rest of the layout. I stamped the smaller sentiment from the Mum and Dad clear stamp set onto the paler pink with a pink oxide ink making sure it's dry before cutting it out with the Mum and Dad Coordinating Dies. 
Then it was just the flowers and fauna to cut out again using the Spring Blooms Dies I tried to balance out the colours the flowers I made opposite on each side.
Once everything was laid out how I wanted it I stuck it down with some liquid glue and that was my card finished up. I hope you like it and don't forget you can get 10% off in the shop using code T4TNATALIE10  Have a good weekend and happy crafting!
 

Saturday, 27 February 2021

Sending Hugs!


Happy Saturday everyone, I’m here to share my first card with the new stamp set from the Spring Blooms card kit. I teamed it with the Lots of Love Vertical Cover Plate Die to make this fun rainbow heart card. 
I cut out the Lots of Love Cover Plate die once out of white card stock which was 360gsm then once again out of white fun foam to give me my base. Then cut out the hearts from rainbow coloured paper. I just cut off enough paper to cut out 3 hearts but if you wanted to make lots of cards you could cut the whole cover-plate out each time. 
I popped the fun foam and white card panels what I cut out on top of a black card base, then I could glue my hearts on the inside. It’s such a quick and easy technique but looks so pretty! 
The sentiments I just white heat embossed into some black cardstock and cut out the hugs with the coordinating dies and the other one just with my paper trimmer. I glued them on my card and that was it finished up! I hope you like it, there’s so many different possibilities with the new spring bloom kit I’m really enjoying playing with it. Don’t forget you can also get 10% off in the shop using code T4TNATALIE10 
Have a great weekend and I will see you next week! 
 

Saturday, 20 February 2021

I love Mew!


Happy Saturday everyone have you had a good week? Surprisingly I have another Smitten Kittens card to share with you all today. I'll be mixing it up next week I promise but I'm sure you will all agree they are totally adorable. 
Todays card is perfect for anniversary's also an added bonus it was really quick and easy to make so perfect if you need one last minute. I used the Dotty Hearts Cover Plate Die to create my base and stencilled a heart on using the Large Heart Masking Stencil and some Worn Lipstick and Picked Raspberry Distress Oxide inks. I started at the bottom with the darker shade and blended up into the lighter one to give an Ombre effect. I also used the Picked Raspberry on a sheet of card and stamped my sentiment on there and cut into a small rectangle with my paper trimmer. 
The kitties I had left over in my stash that I had already coloured up. When I get a new set I tend to stamp out around 3 of each image and colour them all up at the same time. I find this method works so much easier as you already have all the pens out. Its also great to do when your feeling a bit crafty but you don't want to make a card.
I popped them both onto my card alongside the balloons and popped that onto my card base. I hope you like it and don't forget you can get 10% off in the shop using code T4TNATALIE10


Saturday, 13 February 2021

Cosy Days by the Fire!


The weekend is here and we have made it to half term whoop! That means more crafty time for this momma, so I hope your ready for more Smitten Kitten cards. Its been so cold and snowy this week I just wish I was curled up by the fire like these cuties. 
I began by cutting out the rectangle die from the Autumn Scene Cover Plate Die set and added a little Wild Honey Distress Oxide to give a warm glow and my base was ready for my scene. I coloured up the fire from the Warm Winter Wishes stamp set using some light warm greys so that the flames are the main pop of colour. The cats again I coloured up with the warm greys and added some E95, E97 and E99 for the ginger colour. When placing them on my scene I felt like it needed something else to make it look a little more cosy so stamped out the blanket from the Plaid Background Clear stamp set. I popped these all onto the card and added my sentiment from the Be Kind Be You stamp set. 
I finished my card off by mounting it on some burgundy card to match the rug and popped it on my card base. A quick and easy card for today, I hoped you like it, don't forget if you want to purchase ay of the items in the shop you can get 10% off using code T4TNATALIE10


Saturday, 6 February 2021

Hello, I love Mew!


Happy Saturday everyone I have a quick and simple card to share with you all today. It's a layout I've used a few times and works so well. I used the Hello Rectangle Nesting Die to cut out my base it a really great notecard size. Then used the A7 Essential Stripes stamp to create an orange sunset feel using a combination of squeezed lemonade and spiced pumpkin distress oxides.
You have to make sure this is really dry before cutting out the Hello Die otherwise it will smudge, so I  popped it to the side whilst I stamped and coloured up my kitties. You can find this loveable pair in the Smitten Kittens stamp set, its my absolute favourite from the new release. I kept the colours really light just added a little warm grey to both then some spots to the one on the left using E97 and E95. 
Before cutting out the hello I added the I Love Mew underneath the stripes and again made sure my ink was dry before I cut the hello. I cut out the hello on the card making sure to keep the centres of the letters too and out of some fun foam so I could pop it up on my card. I also cut out the matching die for the kitties out of the fun foam too so I could match the height of the hello. 
To put my card together I popped it on my card base then stuck down the fun foam letters where I cut it out then stuck the stamped letters on top. Next carefully adding the inside of the O and the E. I added the fun foam die cut to the kitties but cut off a bit at the top where it layered over the Hello and that stuck it down. That's my card for today I hope you like it and if you want to buy any of the supplies you cab get 10% off in the shop using code T4TNATALIE10 Hope you all have a good weekend and I will see you next week!


Saturday, 30 January 2021

Underneath the Stars!


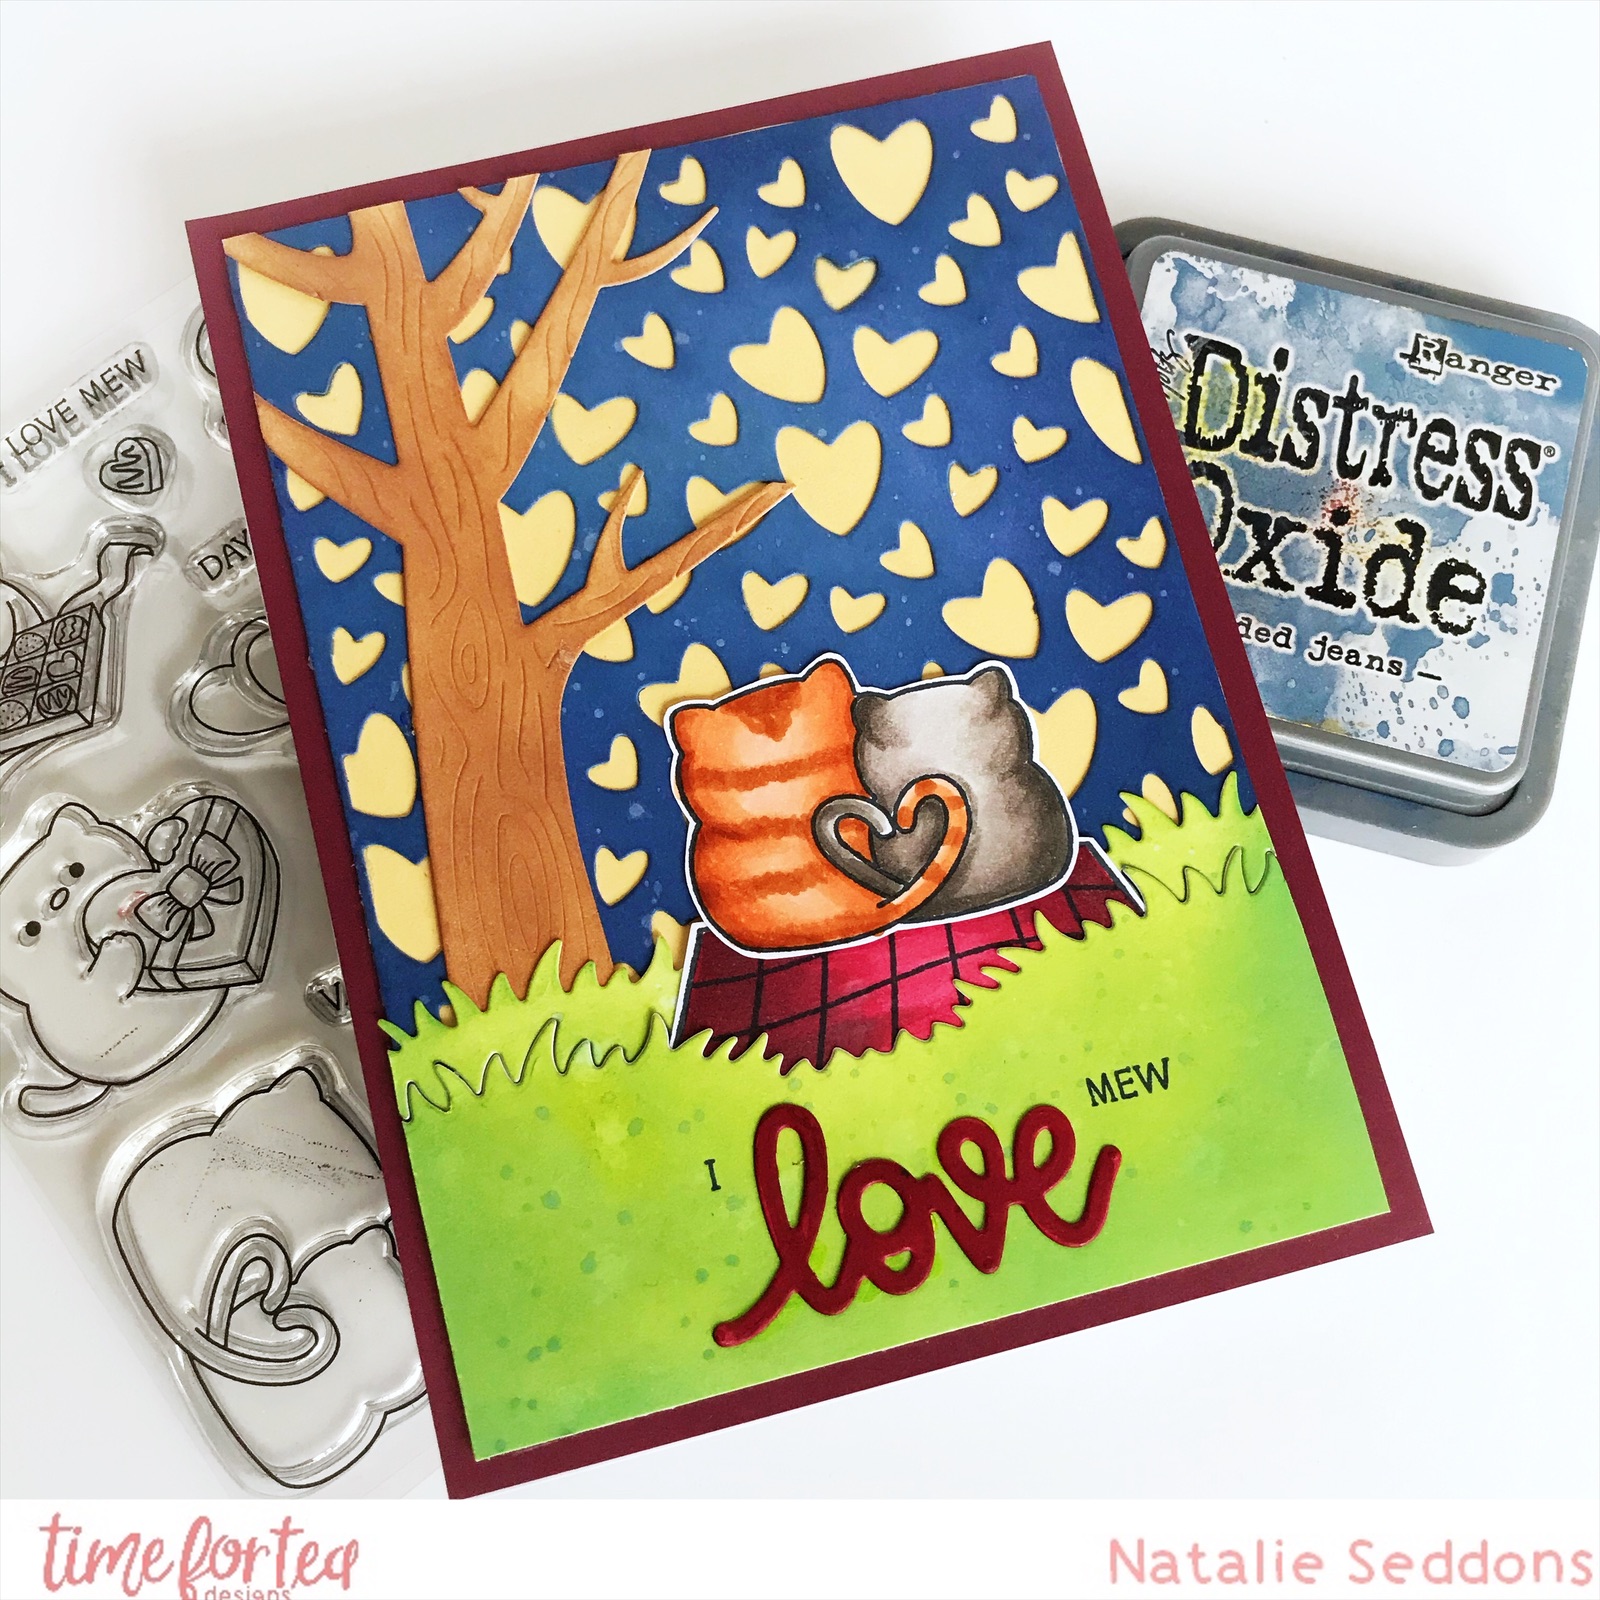
Happy Saturday everyone are you making any Valentine's Day cards? I have a super sweet one to share with you today. I love how these sets work together, for my background I used the Scattered Hearts Cover Plate die. I coloured it up with Faded Jeans and Chipped Sapphire Distress Oxides. Then spritzed some water on to add some texture. I popped that onto some warm yellow card and added some glitter with the clear Wink of Stella brush pens. Then popped that onto some red card and straight onto my card base.
The tree is from the Autumn Scene cover plate die I cut it out and coloured it with a brown distress oxide these really make the embossed details pop. I needed some grass to ground my kitties so cut out some using the Standalone Landscape die I cut out on large piece then cut it out again lower on the same piece. 
The cue kitties are from the new Smitten Kittens I just love how their tales are curled together to form  a little love heart. I used e99, e97 and e95 for the ginger kitty and w7, w5 and w3 for the grey kitty.  I felt like it needed a pop of warmth at the bottom so coloured up the picnic blanket from the Plaid Background Clear stamp set.  
For the sentiment I cut out the love die from the Circle of Love Nesting Die set and stamped out I and Mew at either side. 
I just love how this one came out and I hope you did too, I can't stop colouring up these cute kitties so be prepared to see lots more cards coming up. 
Don't forget if you want to buy anything in the shop you can get 10% off using code T4TNATALIE10


Thursday, 21 January 2021

Sneak Peek Day 3!


It's the last day of peeks and what a cute release, hard to pick a favourite eh! Today we are sharing the Happy Mail Critters stamp set, it comes with the sweetest critters and a great selection of accessories. 
I just love this sweet kitty and it will work so well with so many other Time for Tea sets. I couldn't resist getting him to climb on the boxes to post his letter. 
I love the clean and simple look of this card the pinks really pop against the white. I used the Hello Rectangle Nesting Die set to cut out my base then stamped the Essential Stripes A7 stamp set to add with some Worn Lipstick Distress Oxide. This takes a while to dry so I popped it to the side whilst I stamped and coloured my images. I used the same Pink Copic tones to colour the letterbox and and accessories. I used a soft blue on the mail and some warm creams for the kitty. Then die cut them out and popped them on my card. I finished off with the sentiment from a great new sentiment set called Be Kind, Be You. 
For more peeks don't forget to watch Jo's live tonight and 8 and the new release will be live in the shop tomorrow. Don't forget you can get  10% off your order using code TIMEFORTEANATAIE10


Saturday, 16 January 2021

Cosy Winter


 Happy Saturday everyone, design team member Natalie here. We have had a snowy few days so thought I’d make a cosy winter  themed card. This card was the first one of I’ve made of this kind, so it was very much guess work when I was making it. I love how it turned out though. 
I started out with the circle panel I cut out the Scattered Hearts cover panel die and then cut a circle out of it with the Circle of Love Nesting Dies. Which I ink blended with some Chipped Sapphire Distress Oxide ink and spritzed with a little water for a bit of texture. 
Then I cut out another two circles the same size one I layered underneath the hearts. The other I cut out the snow bank using the Landscape Stand alone Edge dies. 
The bunnies and mistletoe were coloured up using COPIC markers and die cut with the coordinating dies. I popped them on top and that was the topper finished. The rest of the front panel I dry embossed using the Treemendous Christmas stencil. 
To make the base I used a square card base and folded the front panel down the middle. I chopped the dry embossed panel to fit and popped it on and added my topper to the front. 


The card needed a stopper though to keep it open, I cut out the circle from the mini frame and banner die set alongside the little heart. I popped it just past the middle more towards the centre of the card just like this and that was my card finished up.
I really hope you liked it too and don't forget you can get 10% off in the shop using code T4tNATALIE10 

Saturday, 9 January 2021

Home Sweet Home


Happy Saturday everyone,  It's been a long week and I'm so ready for the weekend. I'll be staying home and catching up some missed crafting after a our first week of home school. What about you? Are you creating this weekend?
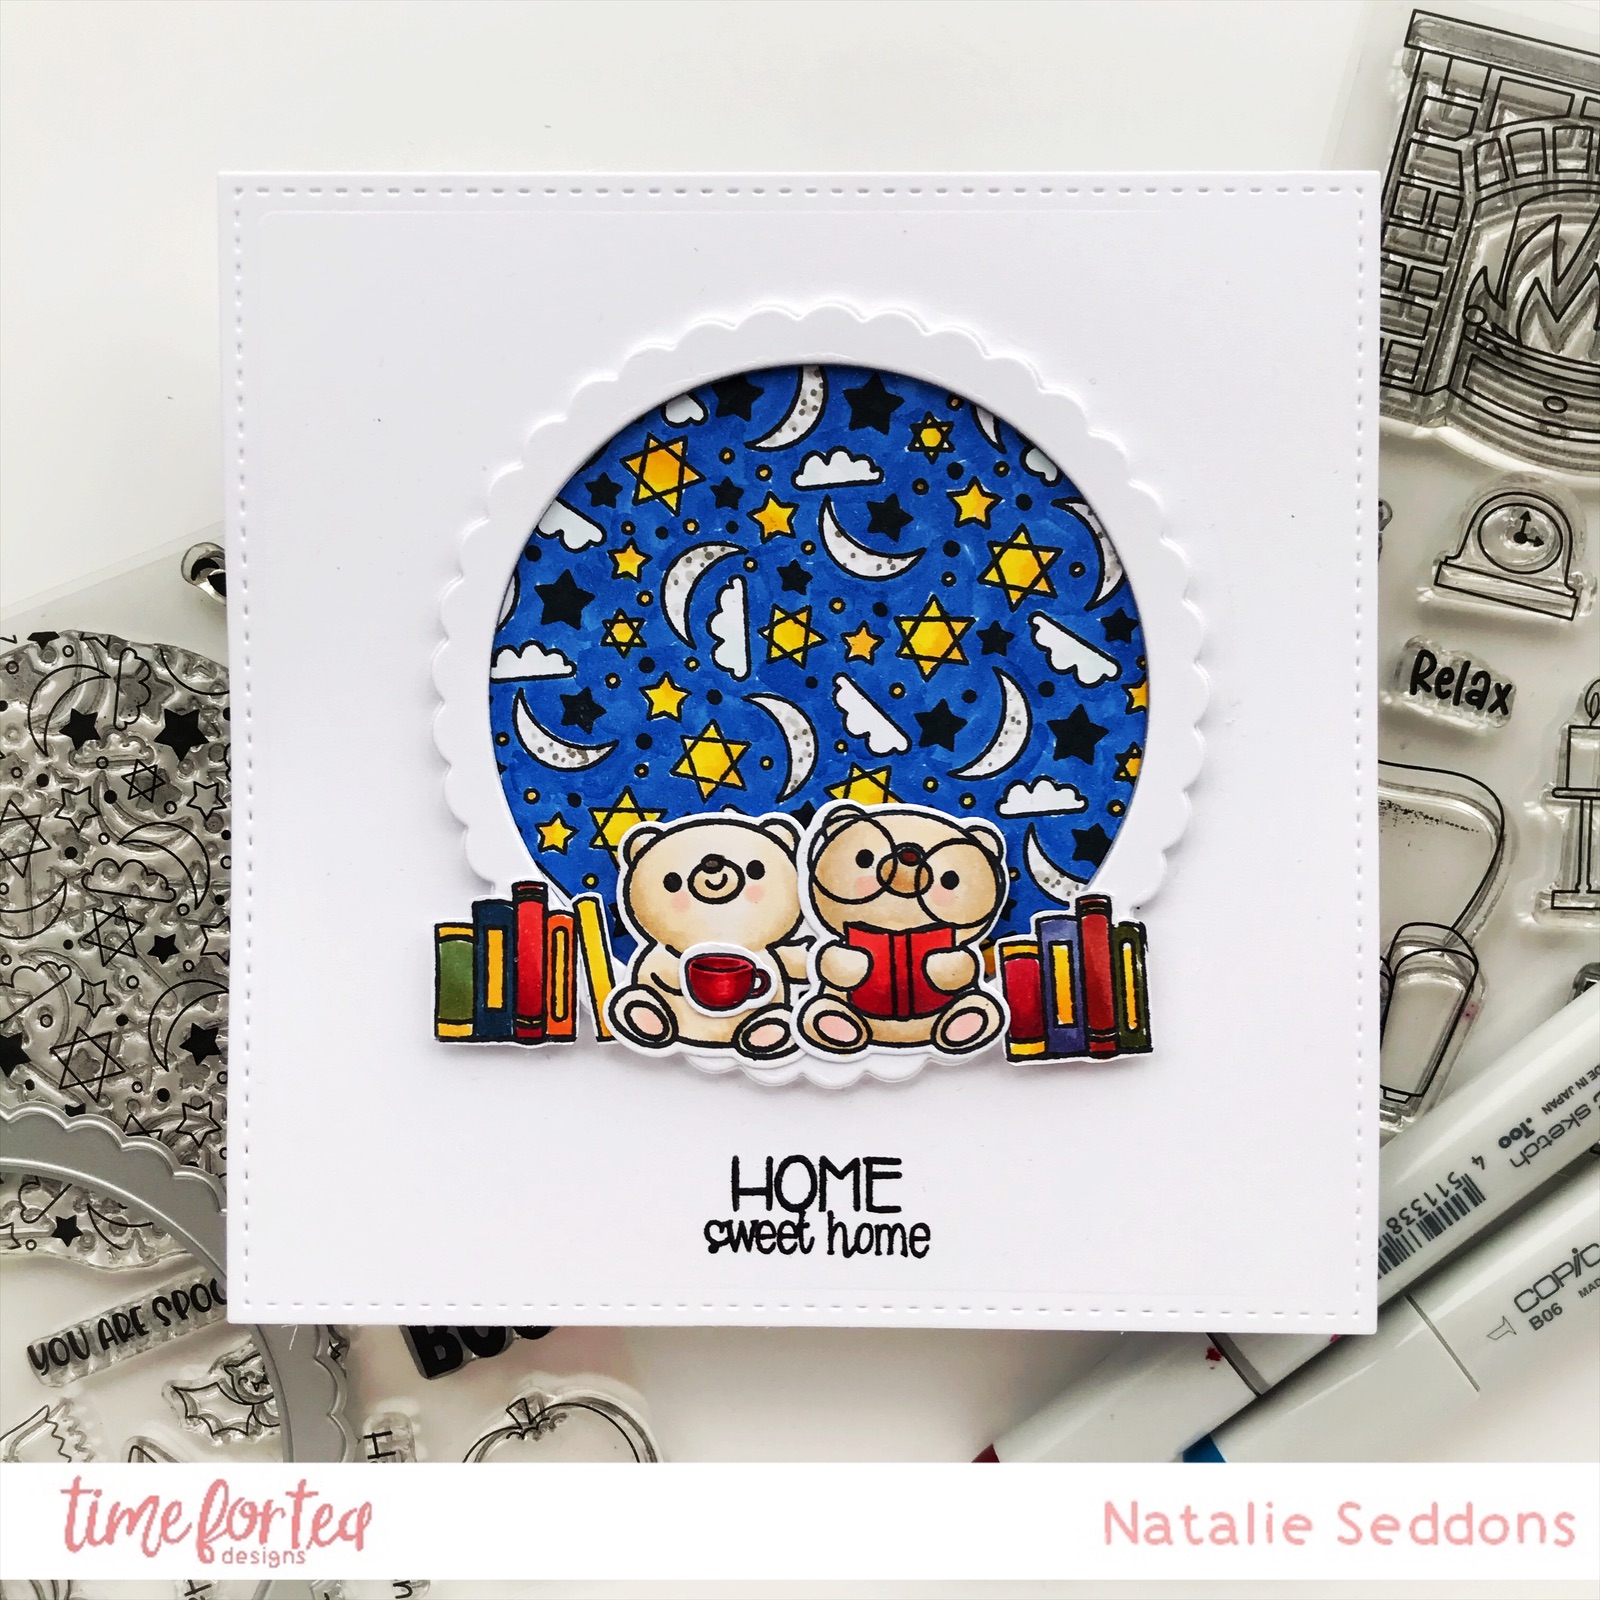
This week I was sad I didn't get to use the Spooktacular Stamp set as much as I wanted to at Halloween so I tried to think of ways to stretch it. I love to stretch my stamps as we know they aren't cheap so I like to get the most out of them.
I decided to combine it with the bear and accessories from the Home Sweet Home stamp set and another of the bears from the Bearing Gifts stamp set. I love that the bears all work so well together.
I started by cutting out three squares from the Quilted Square Nesting Dies two will form our card base and the other I used for the front of the card. I stamped out all my images and coloured them up with Copic Markers, the sky I just coloured up really simply with no shading other than with the little moons. 
The bears I chose some soft browns for so that they would stand out against that dark sky. Then for the books I like to not use too many colours so it doesn't distract the eye and keeps the card more uniform. I used the same yellow as the stars and used a darker shade of blue of the sky and mixed in some rich reds, and oranges. Then using the same red for the little cup. 
Once everything was coloured up I Die cut them out for the books though I removed the shelf that was under them afterwards as I wanted it to look like they were stacked up on the floor next to them.
I also needed to cut out the scallop circle die from the Spooktacular Coordinating Die set again out of white card this will just frame the sky like a window but still be quite subtle.
I popped everything on my card and then finished it up with the Home Sweet Home sentiment and that was my card finished up. I hope you like it and don't forget you can get 10% off in the shop using code T4TNATALIE10
Have a lovely weekend and I'll see you again next week!