Saturday, 2 May 2020

Hip Hop Hooray!


Hi guys design team member Natalie here and I wanted to share with you how I stretched my Say Cheese cover plate die and turned it into a cute rabbit burrow. I've been wanting to create a card like this since I got my cute bunnies and then when I saw the cheese die I knew it would be a perfect fit!
I began as always by cutting out the cheese die then making a rectangle the same measurements to fit underneath. The bottom rectangle I blended with different shades of brown Distress Oxide ink and the cheese die cut with shades of green darkening up the colour around the edges. I wanted to add some grass so I stamped the one from the Moovelous stamp set. I used my clear stamping block so I could bend it around the holes so it looks like tufts of grass growing out of the top. I stuck them together using some foam tape so I could pop my worm and bunny underneath.
I stamped out the bunnies and coloured them up with warm grey oxides and added a little pink to their cheeks. I also stamped out the worm and quite a few carrots as I wasn't sure how many I needed.
Then I just started to lay everything out I stuck my two backgrounds together using some foam tape so I could pop my worm and bunny underneath.
I chopped one of the carrot in two to give the impression it was growing in the ground. Then just added a few scattered round 
The sentiment I heat embossed the sentiment on some black card using white embossing powder popped it on the top and then popped my card onto the card base and my card was done. 
I hope you all have a great day and liked my card for today happy stamping!


Saturday, 25 April 2020

Dream Big!


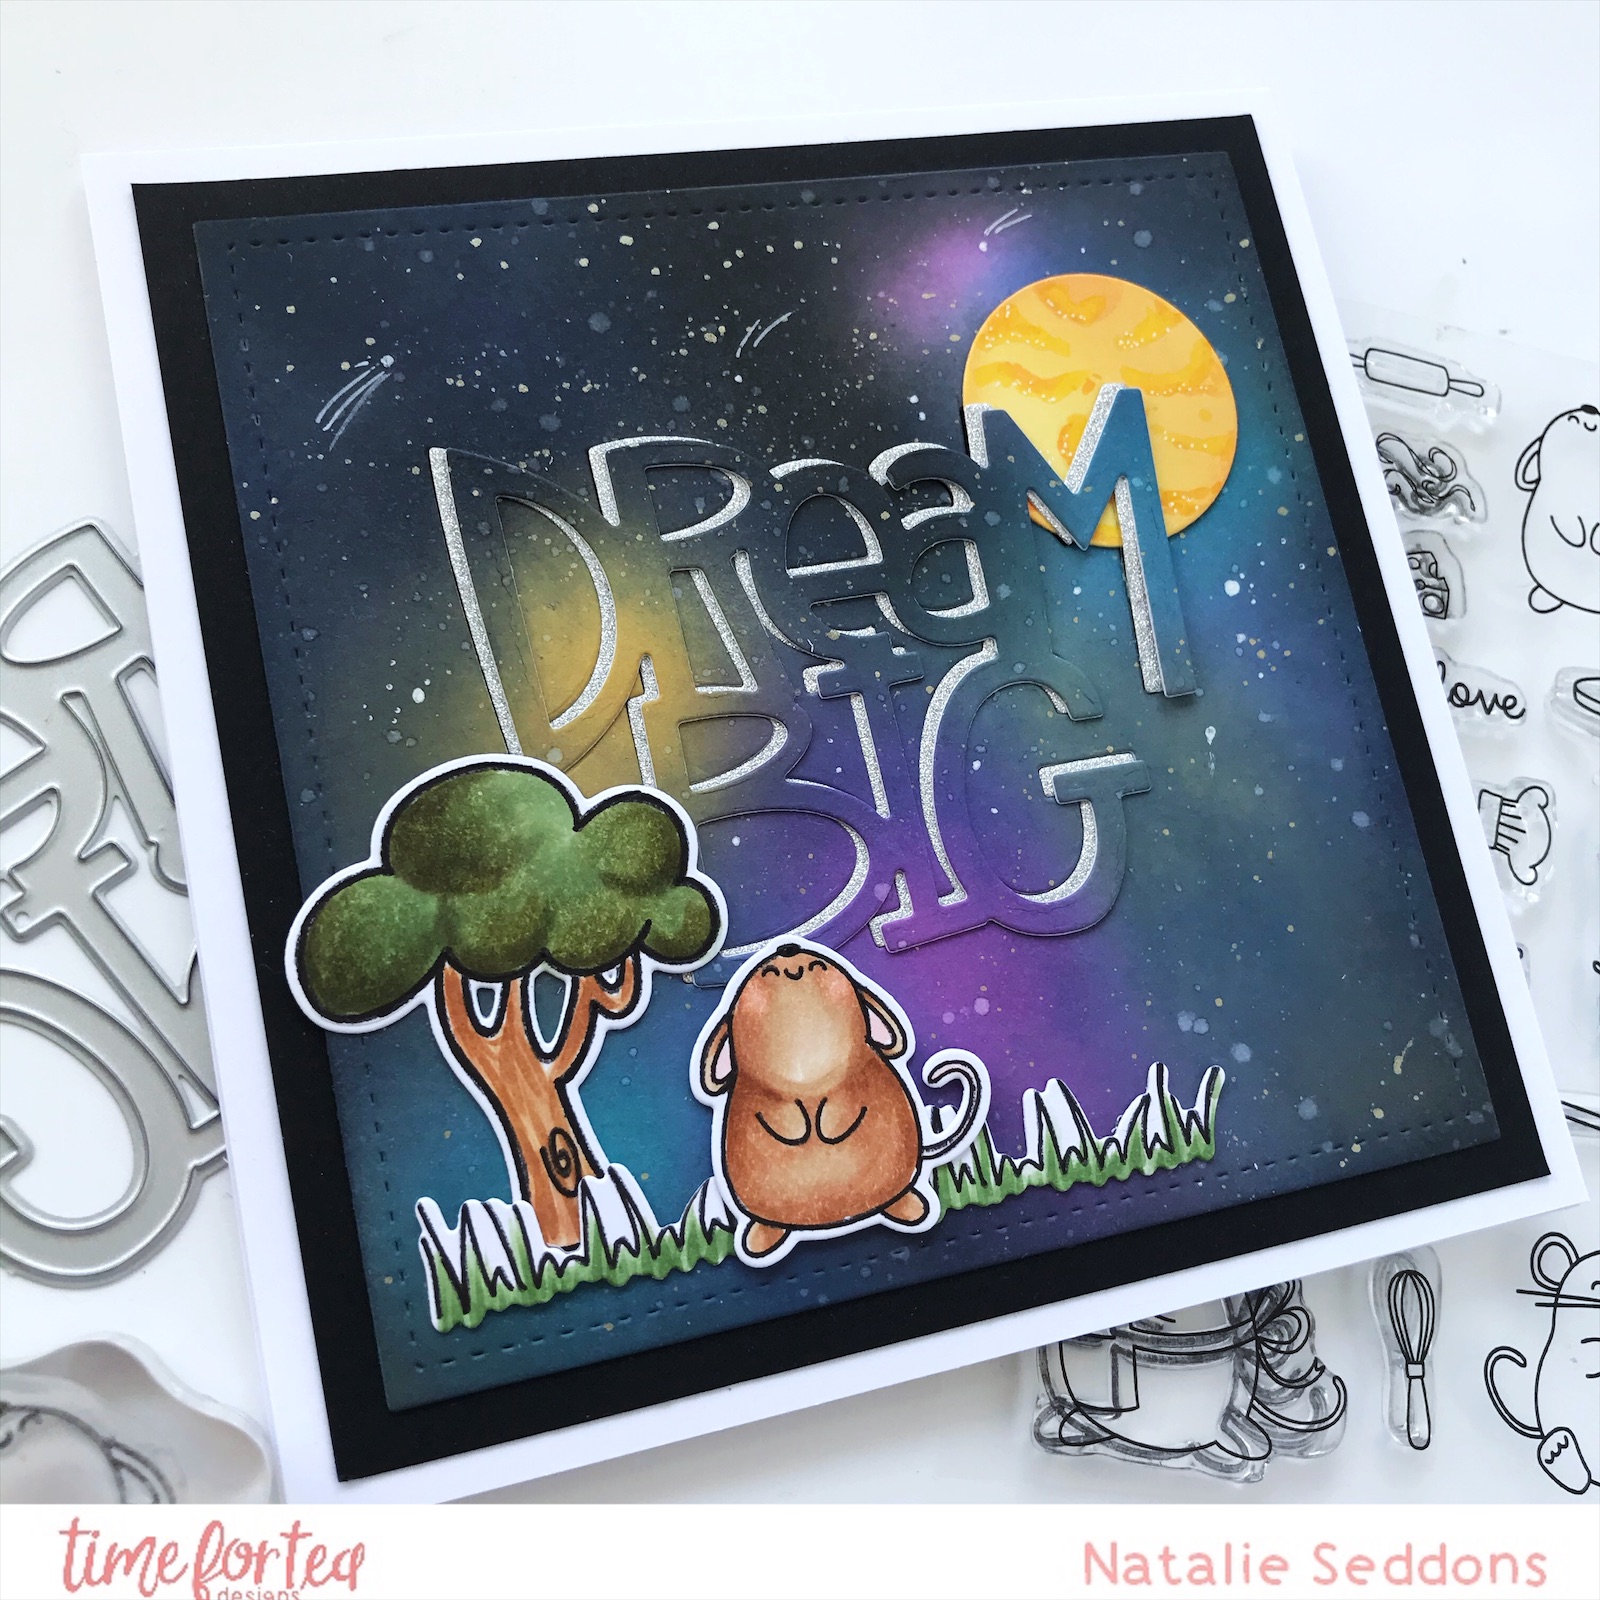
Hi guys hope your doing well! How much do you love the new release?! I absolutely adore these sweet mice in particular this cutie. As soon as I saw him I knew that I wanted to create a starry sky card with him looking up at a moon made of cheese. 
I started off by creating my night sky it’s such a fun technique. I used the second largest Quilted Square Nesting Dies to cut out a square from some Bristol Smooth Cardstock. I find this blends a lot easier which helps when you want to use lots of layers of colours. I laid down a base of violet, squeezed lemonade and peacock feathers distress oxide inks. Then when I had a fair bit of coverage I went over the top with some chipped sapphire and black soot distress oxides going lightly over the colours so they are still showing through and a bit heavier around the edges. When I was happy with my results I spritzed some water and dabbed it off then flicked some silver paint over the top. 
Making sure it was all dry I cut out the dream big sentiment in the centre and then cut it out in some  silver glitter paper. I mounted the galaxy background on some black cardstock and then Inlaid the silver in the dream big cut out. Then overlaid the galaxy dream big over the top but more to the right giving it a 3D effect. 
I cut out a circle for the cheese moon and stamped out my tree, grass and mouse and coloured them up with COPIC markers. Then stuck them down on the sky hiding the joint in the grass with the mouse. I added some more stars and a few shooting ones with my white gelly roll pen. Then mounted it onto my card base and my card was finished. I just love how versatile the mouse stamp is and so, so adorable it’s definitely turning out to be one of my favourites alongside the pandas. 


Saturday, 18 April 2020

No one is Cheddar than you!


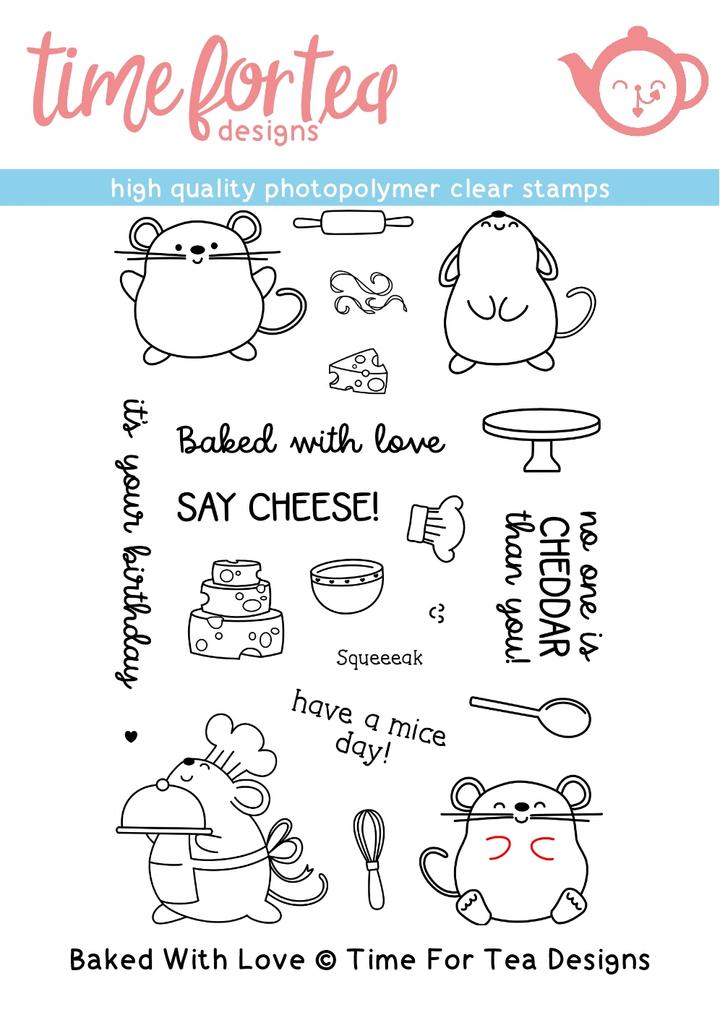
How cute is the new release from Time for Tea honestly I've had so much fun with the new Baked With Love set and the Say Cheese Cover Plate Die. My first card I made with the die had to be a big block of cheese but keep an eye out for the rest of my posts where I've mixed up the colours or used parts of it to turn it into other fun things like the moon and a rabbit burrow! It really is so versatile and I have made it a fun challenge with myself to find other things I can make with it.
So onto todays card which was really easy to create I started by cutting out the Say Cheese Die out of white cardstock then blending squeezed lemonade and spiced marmalade oxide over the top then spritzing it with water to add some texture. Using the piece I just coloured I used this as a guide to cut a back piece which I coloured the same way but using just the spiced marmalade, the darker colour will add depth in the holes. The yay was created with the hooray die which I cut out twice then coloured with the spiced marmalade and spritzed again with water.
I stamped out the mice and coloured them up with warm grey copics and the R11 colour for the cheeks and feet and cut them out with the matching dies. I love how the die for the little mouse at the bottom cuts out his little hands so he can hold the block of cheese.
Once everything was coloured and cut out it was time to put the card together but before sticking together the background I needed to add my sentiment I laid the two backgrounds on top of each other and placed them in my Misti this enabled me to stamp the sentiment perfectly in the hole.
Then I added some foam tape on the back of the background with the holes in and stuck it onto the base card and added my mice and mounted it onto my card base. It was such a simple card to make but still looks great! 


Saturday, 11 April 2020

Create Pandemonium!


Hi guys I can’t believe Saturday is here already this week has flown by! 
I know it’s those Pandas again but can you blame me they are just the cutest. I’ve had this idea in my head for while now so it was nice to finally get it down on paper even though it looks nothing like I pictured. I’m really pleased with the final result though and I hope you like it! 
I started by cutting out the Quilted Square Nesting Dies and ink blending a sky on it with the sunny side up stencil. Then just blended some green on the floor to represent the grass. Once this was finished I used the smaller square to cut out the centre this is where we are going to lay out our scene. 
I stamped out lots of the bamboo and a few leaves and the two pandas. They are just simply coloured with warm greys to add some shading to the pandas and pink for the cheeks then a few bright greens for the bamboo. I cut them out with the matching dies and got ready to lay out my scene. 
I wanted it to look like my panda was climbing up the bamboo so stuck him down at the top and the other one off to the right munching away on his lunch I then used this to this help me find the best place for my sentiment. Which I just stamped it straight onto the card using a stamping block. Then I just placed the bamboo around them tucking some behind the bears to give the height without having to cut loads of bamboo out. 
Once this was all stuck down I needed to make the base of my card I cut out a square of card using the same die we used to make the larger of the squares. I then used this to measure out a square of fun foam this will pop out the outer frame you could use foam pads but this just makes it a bit more sturdy. I cut out the big square using my scissors then to cut the square out of the middle and to get the centre in the right place I laid the smaller die on top of the inked frame and fun foam making sure it was perfectly centred so as to not cut out the paper frame just the inner foam then run it through my die cutting machine. 
We only need the outside frame of the fun foam so I just saved the square for another project. I stuck the fun foam to the frame using read tape and then stuck this on to the base we cut out earlier. Doing it this way we can make sure the inside is stuck in the right place. I then just cut another square of card the same sizer and scored along the top about 5cms down this we will use to create the back of our card. I stuck some red tape on the very top above the score line and attached it to my card and that's it finished!


Saturday, 4 April 2020

You Make Me So Hoppy!


Hi guys I can’t believe it’s Saturday already! For today’s post I thought I’d mix it up from my favourite Pandas and use those adorable Toads from the Toadally Awesome Clear Stamp Set. I got these a while ago and I’ve been itching to ink them up. I love making scene cards so I thought I’d make a pond scene, as always I decided which die I was using to make my base. I wanted some added interest though so used the Hello Stitched Rectangle Frame Dies and paired the two largest dies together to create a frame. I like that they are a slimmer rectangle so very on trend right now.
Taking the inner panel out I used the Sunny Side Up Stencil to create the clouds I wanted a light blue so just used the ink that was already left on my blender brush. To make the waves in the pond I cut out the smaller rectangle die again and used the Best Fishes Banner and Border Die set just lining up the wavy cut point at the right height I needed it to be making sure it was dead centre as not to cut the edges. I repeated this twice. This was then coloured with Peacock Feathers and Blueprint Sketch oxides and spritzed with water to add some texture.
Apart from the Bulrushes which are from the Moovelous set all the stamped images are from  Toadally Awesome. I wasn't hundred percent on my layout at this point so I stamped quite a few bulrushes and leap pads out and coloured them up with darker greens as I wanted the frogs to be a nice bright green to give some contrast. I added a few more pops of colour with the red ladybird, heart and bowtie then to tie in with the frogs coloured up the butterfly in yellows and oranges. 
I was originally going to add my sentiment at the top but it looked to cluttered up there so I stamped it out and cut it out with the co-ordinating dies and added it to the waves at the bottom. I think the layout worked really well its not too cluttered so doesn't distract the eye but there is enough detail to not to make it look like its missing something.
Anyways I hope you liked todays card crafting is definitely helping me stay calm in these uncertain, scary times. Let me know what you guys have been upto in the comments below. 
P.s Theres also a cheeky 10% off code for the Time for Tea shop if you want to buy some goodies just add T4TNATALIE in the voucher code section when checking out!


Saturday, 28 March 2020

Sending Bear Hugs!


I made this card a while ago and if you watch our facebook lives you may have seen a peek of it before. The sentiment today seems more appropriate than ever whilst we go through these uncertain, scary times. The Pandemonium Party stamp set has fast become one of my favourites as you might be able to tell. I love how quick they are to stamp and colour, so perfect for a quick and simple card like this one.
To start my card I cut out three sizes of the new Quilted Square Nesting Dies the two larger ones and the last square before the quilted square. The blue background and the night sky were created the same way using a combination of Blueprint Sketch, Faded Jeans and Black Soot Distress Oxide Inks. I just randomly smooshed the blues in the middle and added the black around the edges to darken it all little Then using a small spray bottle I sprayed some plain water on there to react with the ink and left it for a couple of seconds before blotting it off with a paper towel. This adds some added texture and interest but I wanted some stars to give the feel of a night sky so added some gold splashes using my Gansai Tambi Starry Colours Paints.  
The Panda I stamped out using memento tuxedo black ink but then I went over with black copic marker to give it that extra pop. Then I just added some rosy cheeks and paws and a red heart. The bamboo was simple colour too just using two shades of green since its only a little area. Make sure the paint and ink is dry before you stick down your images otherwise the gold might smudge. 
I added some foam tape to the back of the square to pop the image out a little bit but before I could stick this on I needed to stamp my sentiment out. After sticking it all together I popped it on a card base and then my card was finished. I hope you like it and I can’t wait to see all your creations! 


Saturday, 21 March 2020

Panda Party!


Hi guys it’s Natalie on the blog again today and I have this cute panda birthday card to share with you all. I mixed up a few different Time for Tea sets for this one I love how they all work so well together. I loved that idea of creating a Panda Playground its just super fun. 
I began my card by cutting out the largest rectangle from the new Quilted Square Nesting Die set and used the Sunny Side Up stencil to add some grass and clouds. 
Then it was time to colour up my pandas and all the other accessories. The Trampoline and Worm are from Hip Hop Hurray, the flowers from the Moovelous  Stamp set and the butterfly from the Butterflies stamp set. 
 I love that the pandas are so quick to colour up I just added a little shading to their tummies and face using a warm grey COPIC and added some rosy cheeks  with a soft pink COPIC. I tried not to add too many colours for the accessories and just stuck to blue, pink, orange and yellow. 
There was no fancy colouring for the accessories either they are only really small so a couple of shades of each were all that was needed. With the party hat I added some extra stripes with my white gelli roll pen.
When everything was coloured up it was time stick it all together and add my sentiment. I got a general layout first then I could figure out where to stamp the sentiment I used my stamping machine to do that to make sure it was straight. 
I used the bamboo stamp to make the climbing frame and just added a few accessories like flowers or leaves on the joints to hide them a little. When everything else was stuck I went in with my black fineliner and added a trail for the butterfly and stamped in some jump marks underneath the panda on the trampoline. 
I love how this one turned out and I hope you do too!


Saturday, 14 March 2020

Hooray Hamsters!


So I got some glitter texture paste and I’m
not going to lie I can’t stop using it! It’s so, so pretty I wish you could see the sparkle more in this imagine.
I didn’t know where I was going with this card I just had this idea for a background and it went from
there. I created it using two stencils layered over the top of each other. I cut out my card base and placed the circle masking stencil over the top and then added the zig zag stencil over the top of that make sure you stick them down with post it tape/wash so they don't move around. Using Picked Raspberry Distress oxide I created the first set of zig zags with my Time for Tea Blender Brushes then taking the stencil off I placed it over the top of the pink zig zags that we just created so it would mask them off so I could create some orange zigzags using Marmalade Distress Oxide ink. Once this was done I took off the zig zag stencil but left the masking circles in place. Then I added my Luna glitter paste over the top being careful not to add too much other wise it would seep through underneath the stencil. When using this paste make sure you give your stencil a thorough clean before it dries. I then left my background a good day to dry as it was quite thick. 
I stamped out the hamsters and a few other elements and decided on a blue, pink and yellow colour scheme tying in with the circles but then adding an extra pop with the blue. When colouring up the balloons i tried to think about where my shading would be using the darker colour around the edges and then leaving a pop of white for a highlight this gives them a 3-D look as oppose to just a flat image. 
For my layout i tried to get images in all the circles but also at the same time tried not to cover them up topo much as I wanted them to be a big feature in the card.
The sentiment was heat embossed on some black cardstock with white embossing powder and popped up with some foam tape and thats it my card is finished for today I hope you liked my tutorial. 


Saturday, 7 March 2020

It's Hammy Time!


How adorable are the new hamsters! I couldn't wait to colour them up when I saw them I decided I wanted to colour them up as though they were having a party in their hamster house. I stuck to a limited colour scheme as not to distract the eye with lots of colours and just used my favourite red combo for a pop of colour.

I began by cutting out my base for the card using the new Hooray Die then adding a bit of scattered straw distress oxide at the bottom with the Time for Tea Blender Brushes. Then it was time to add some straw at the bottom I just added flicks with my Copic Markers in different shades of brown. Then flicked a bit of brown oxides for a bit of added interest.

I stamped out my hamsters and a few of their accessories and die cut the hooray die cutting out an extra Y so I could spell yay instead. These were all coloured with the same shades of reds, browns and cool greys. I die cut them out or you can fussy cut them and stuck them all on my card and then finished it off with the fun "Its Hammy Time" sentiment. It really was a quick card to make the thing that took the longest was the planning as I played around for ages with the layout. I just love the fun look though and I'm really pleased with how it all turned out. 
P.S Don't forget you can get a 10% shop discount using my code T4TNATALIE10


Blender Brushes


Saturday, 29 February 2020

Are you ready for a sneak peek!


Hi Guys, I’m super excited to be joining Time for Tea Designs as a design team member and for my first post I get to share a sneak peek of the brand new release! You are going to love it its totally adorable in keeping with all things Time for Tea. These cute pandas are so much fun to ink up and great for quick cards as you can add as little or as much detail as you want.
As you all probably know by now I love making scene cards so I grabbed my scalloped rectangle die and cloud stencil and began creating my background. I used Tumbled Glass oxide and the Cloud Stencil to create the sky then using the same stencil to create some grass at the bottom using Twisted Citron distress oxide, blending with my Time for Tea blender brushes.
I stamped out my sentiment using my misti so I could make sure it was straight and I got a crisp print. Then it was time to ink up the pandas and all of their cute accessories. I stamped out the pandas and added some shading with warm greys copics and a little pink for some rosy cheeks. Then coloured up the bamboo and accessories colouring with the same shades of red and green as I didn't want to distract too  much from the pandas using lots of colours and added them to my image.
I hope you like my card for today I had so much fun colouring up this scene be sure to keep checking our posts throughout the week for more peeks and inspiration.
P.s if you add the code T4TNATALIE10 in the Time for Tea Shop you can get a 10% discount happy shopping! 


Smile Sentiment and Scalloped Frame Die Set


Blender Brushes


Clouds Stencil

Thursday, 30 August 2018

Shake it Up!

Hi guys this week over at Craftin Desert Diva's we are sharing some fun shaker card inspiration.
I used the new mini Best Friends Stamp set to create this adorable summer themed shaker.


The base is cut out using the Fancy Frame dies and I cut out the oval using the Inside Scalloped Oval Dies. I coloured the oval scallops using a range of yellows blending to oranges. For the inside of the shaker card I used Bristol smooth cardstock and the new landscape hill scene 2 stencil to create a wave like look. 
The floaty girl I also coloured with a range of copics and added some glossy accents to her sunglasses. Make sure to stamp your sentiment as well before you stick your shaker together otherwise it will be difficult to get an even stamp. When you have everything coloured up and stamped you just need to stick everything together I used my atg to attach the inside scallop to the card and then added tape all round the sides so that we can stick our acetate window on. Once the acetate window is added stick foam tape all around the edges making sure to leave no gaps as you sequins will escape. I find it easier to take the tape off the back of the foam tape then add my sequins otherwise I get my fingers stuck and the sequins bounce everywhere! Then it’s just time to stick on the waves that we made. Once you flip it over you have your shaker! 
I finished it off my colouring a base for it with the same orange and yellows we used for the scallop. Then attached it to that and then attached it to my card base and we’re all finished. I hope you enjoyed my tutorial today ❤️