Saturday, 23 July 2022

Have a Beary Good Day!

Happy Saturday Teatimer’s it’s DT member Natalie here on the blog with this super sweet bear card. I haven’t been well the past few weeks so needed a quick card for my post for today. Luckily when I colour up my stamps I always stamp and colour about three out of each image and then I have some left for another project later on. 

These sweet bears are from the Bears Picnic Clear Stamp Set. It’s such a sweet set with four bears a picnic basket some little ants and picnic food. I’ve used it many times and still love it so much! 

As you can see I added two of the same stamp but just coloured them up in different ways. As I wanted it to look like two friends having a Frappuccino in the park and then flying their kites way up in the sky. 

The background was pretty simple to make too the Stitched Slimline Slope Dies make for quick easy backgrounds. I just inked up the inside with different Distress Oxides to give the impression of grass and sky. Great for when your in a rush! I did layer the frame twice to add some depth and dimension. 


 For the sentiment I heat embossed white onto black card. I love this technique as it makes the sentiment really pop. Then to finish off my card I added some details with my gelly roll pens just adding some dots of colour in the sky and grass and then little dots on the cheeks and some shiny black noses. 

I hope you like my card for today and if you want to pick up any of the products you can get 10% off in the Time for Tea shop using code T4TNATALIE10 ❤️

Tuesday, 12 July 2022

Heffy Guest Designer


Hi it's Natalie here and I'm so excited to have been asked to be July's Guest Designer for Heffy Doodle. The critters are just the cutest and I had so much fun creating this Jungle at night scene card. 
I began my card by cutting out the Go Wild (A2) Frame Dies and ink blending them with a mix of Twisted Citron and Mowed Lawn Distress Oxide inks. I also cut the frame out of green fun foam to add some depth and create the impression of a deep, thick jungle. 


Next I needed to create the night sky so cut out a piece of white card to fit behind and layered on Chipped Sapphire, Uncharted Mariner and Tumbled Glass Distress oxide. To which I spritzed on water and dabbled it off and splattered on some gold watercolours to resemble stars. Once this was dry I added the vines using Rustic Wilderness Distress Oxide and the vine stamps from the Chimply the Best Stamp Set. 
S


I stamped out all the chimp images, the bananas and vines with memento tuxedo ink on to copic paper and coloured them up with copic markers. For the monkeys I used E37, E35 and E31 for the fur and then E31 and E42 for the faces adding R20 to the cheeks and ears and R32 to the tongue. Finishing them up with some White gelly roll pen dots on the cheeks and black on the dotted eyes.  I don't have the Chimply the Best Coordinating Dies so I fussy cut my images but I'd definitely recommend  getting the coordinating dies as they are a little fussy to cut and the dies would save so much time. 


For the main sentiment I used the big Go Wild die in the Go Wild (A2) Frame Dies using black card for the shadow part and Silver Glitter card for the letters. The black just makes it really pop and I thought the silver works well for the night sky look. 
When adhering everything to my card I tried to add some dimension by adding vines behind the lettering and underneath the frame alongside some of the bananas too. 
Once everything was adhered I added some dots and stars to the sky using the same white gelly roll pen and that was my card all finished up. I hope you enjoyed my tutorial for today be sure to come back soon for some more inspiration. 


Saturday, 2 July 2022

You’re a reel star!


Happy Saturday Teatimer's I have a fun 3-D cinema card for you today. It was super easy to make and great for kids birthday cards or your movie loving friends. 
I cut out and coloured up the Movie Night Stamp using copic markers. Adding some finishing touches with a black gelly roll pen on the nose and some cute white dots on their cheeks. Once everything was cut out I could cut out the base. I used the Box Clever Die Set for this and cut it out of black card. This way I could figure out the height in which the seats needed to be. Adding the back one a little higher like it would be in the cinema.
It was at this point I realised I needed a pop of colour so added a lot of movie tickets in the background. Then at the sides I added some white panels which I stencilled the Popping Popcorn 6 x 6 Stencil using yellow and orange distress oxides, as you can see below.


To finish off the front I used the Purrfect Day Scene Builder Dies for the curtains and coloured them up with copic markers adding some little gold bands with a gold marker. Then for the sentiment I cut out another black strip and heat embossed my sentiment I didn't have any yellow embossing powder so coloured over my white with the same yellow copic marker over the top. I don't know whether this is good for your copics though so I wouldn't do it often and I scribbled off some ink on some scrap paper just in case. Then that was my card finished up. You can find all the products in the shop and get 10% off your order using code T4TNATALIE10. 


Saturday, 11 June 2022

Sending love!

Morning Teatimer’s the sun is shining and it looks like it’s going to be a lovely weekend. Have you any plans? I'm off to Stamp Magic tomorrow and super excited!
My card this week really did not turn out as planned but I love how it now, looks like a night sky full of stars. I wanted to create a card for Jo and Ant after the sudden loss of their beautiful kitty Rosie. It's so hard loosing a fur baby and I wanted them to know we were thinking of them. 
My plan originally was to have a plain white background with the paw prints but I really struggle with CAS cards and wast loving the look. So I created the base by cutting out the largest rectangle from the Layering Dies Metric Sized  and layered on the paw prints cut out with the Pawsome Dies
For the rainbow I used the Rainbow Mini Shaker Die and cut it out of coloured card and added clouds using the coordinating die from the Storm's Don't Last Forever Clear Stamp set. The cute kitty is from the Puurfect Day Stamp set and coloured up with Copic Markers. 
It was at this point I realised I really didn't like the plain white background so tried water colouring in blue around the paw prints but that wasn't working either. So i grabbed my trusty Distress Oxides and began blending with a range of blues and adding black soot around the edges to darken them up. 
I added some splatters of gold paint and stars using white gelly pen and adhered my rainbow and kitty finishing it up with some clear sequins and a black frame using the A2 Nesting Dies
That was my card finished up for today, I hope you like it. You can find all the products I used in the Time for Tea Shop and get 10% off orders using code T4TNATALIE10 . 
Have a great weekend!


Saturday, 28 May 2022

Hello, I miss you!


 Happy Saturday Teatimer’s these weekends are coming around fast! Have you been doing lots of crafting this week? I’ve been busy creating once again, using the super cute new release. This week I thought I’d better colour up something else besides those adorable kitties, so these cuties are from the new Let's Chat Stamp and Die set
I stamped them out using memento Tuxedo Black ink and coloured them up with copic markers. Cutting them out with their coordinating dies and adding some finishing touches to their cheeks and noses using black and white gelly roll pens. 
For the background I used the Flirty Flowers Cover Dies which I cut out of white card and layered on top of a white card base. I added a white frame using the Smile Inverted Scallop Frame Dies and popped it up using some white foam tape. 
The big Hello sentiment is from the Hey, Hello, Hi Dies set which I cut out of fun foam as well as the pink paper so it would be the same height as the frame and it's so much easier than faffing with the foam tape. 
I love how the Time for Tea Coordinating Die Sets cut out the sentiments too so I heat embossed my other sentiment onto black card and cut that out using the Coordinating Dies. For the other sentiment I cut out one of the speech bubbles from the Speech Bubbles Coordinating Die Set and heat embossed the I Miss You inside it. Top tip it's easier to stamp and then cut out. I laid these two sentiments flat so that it was the hello die that was popped up alongside the cute Critters and the telephone. This just adds a bit more dimension and interest to your card. 
It really was a quick card to make with nit much colouring and perfect for sending to someone to give them a pick me up!
I hope you like it and if you want to pick any of the items up in the Time for Tea Shop,you can get 10% off your order using code T4TNATALIE10 ♡ 

Saturday, 21 May 2022

Meow you Doing?

Hi everyone it's DT member Natalie here with another sweet kitty card. I just couldn't resist colouring them up again they are just so fun! I teamed the kitties with the new Pawsome Dies and Pawsome Rainbows Paper Pad
I began by cutting out a base out of white card by using the Imperial size Layering Dies and then taking the Pawsome Dies, I randomly cut out paw prints around the card. I used the biggest one at the bottom and got smaller as I went up as I thought it was more aesthetically pleasing. This was then popped over the top of a sheet of the Pawsome Rainbow Papers using foam tape to add a bit of depth. 
The cats I stamped from the Puurfect Day and the Hey There Critters Stamp and Die Sets. I used Mememto Tuxedo Black ink to stamp and coloured them up with COPIC markers and cut them out with the coordinating dies. Using some black and white Gelly Roll pens I also added some finishing touches on their noses and cheeks and adhered them onto the card. 
For the sentiment I white heat embossed onto black card and cut them out into strips and laid one next to each kitty. Then just popped it all onto my card base and that was my card all finished up. 
I hope you like the finished result you can find all the items in the Time for Tea Shop and if you want to purchase anything there you can get 10% off your order using code T4TNATALIE10T4TNATALIE10. Have a great weekend and I’ll see you next week ❤️

Saturday, 14 May 2022

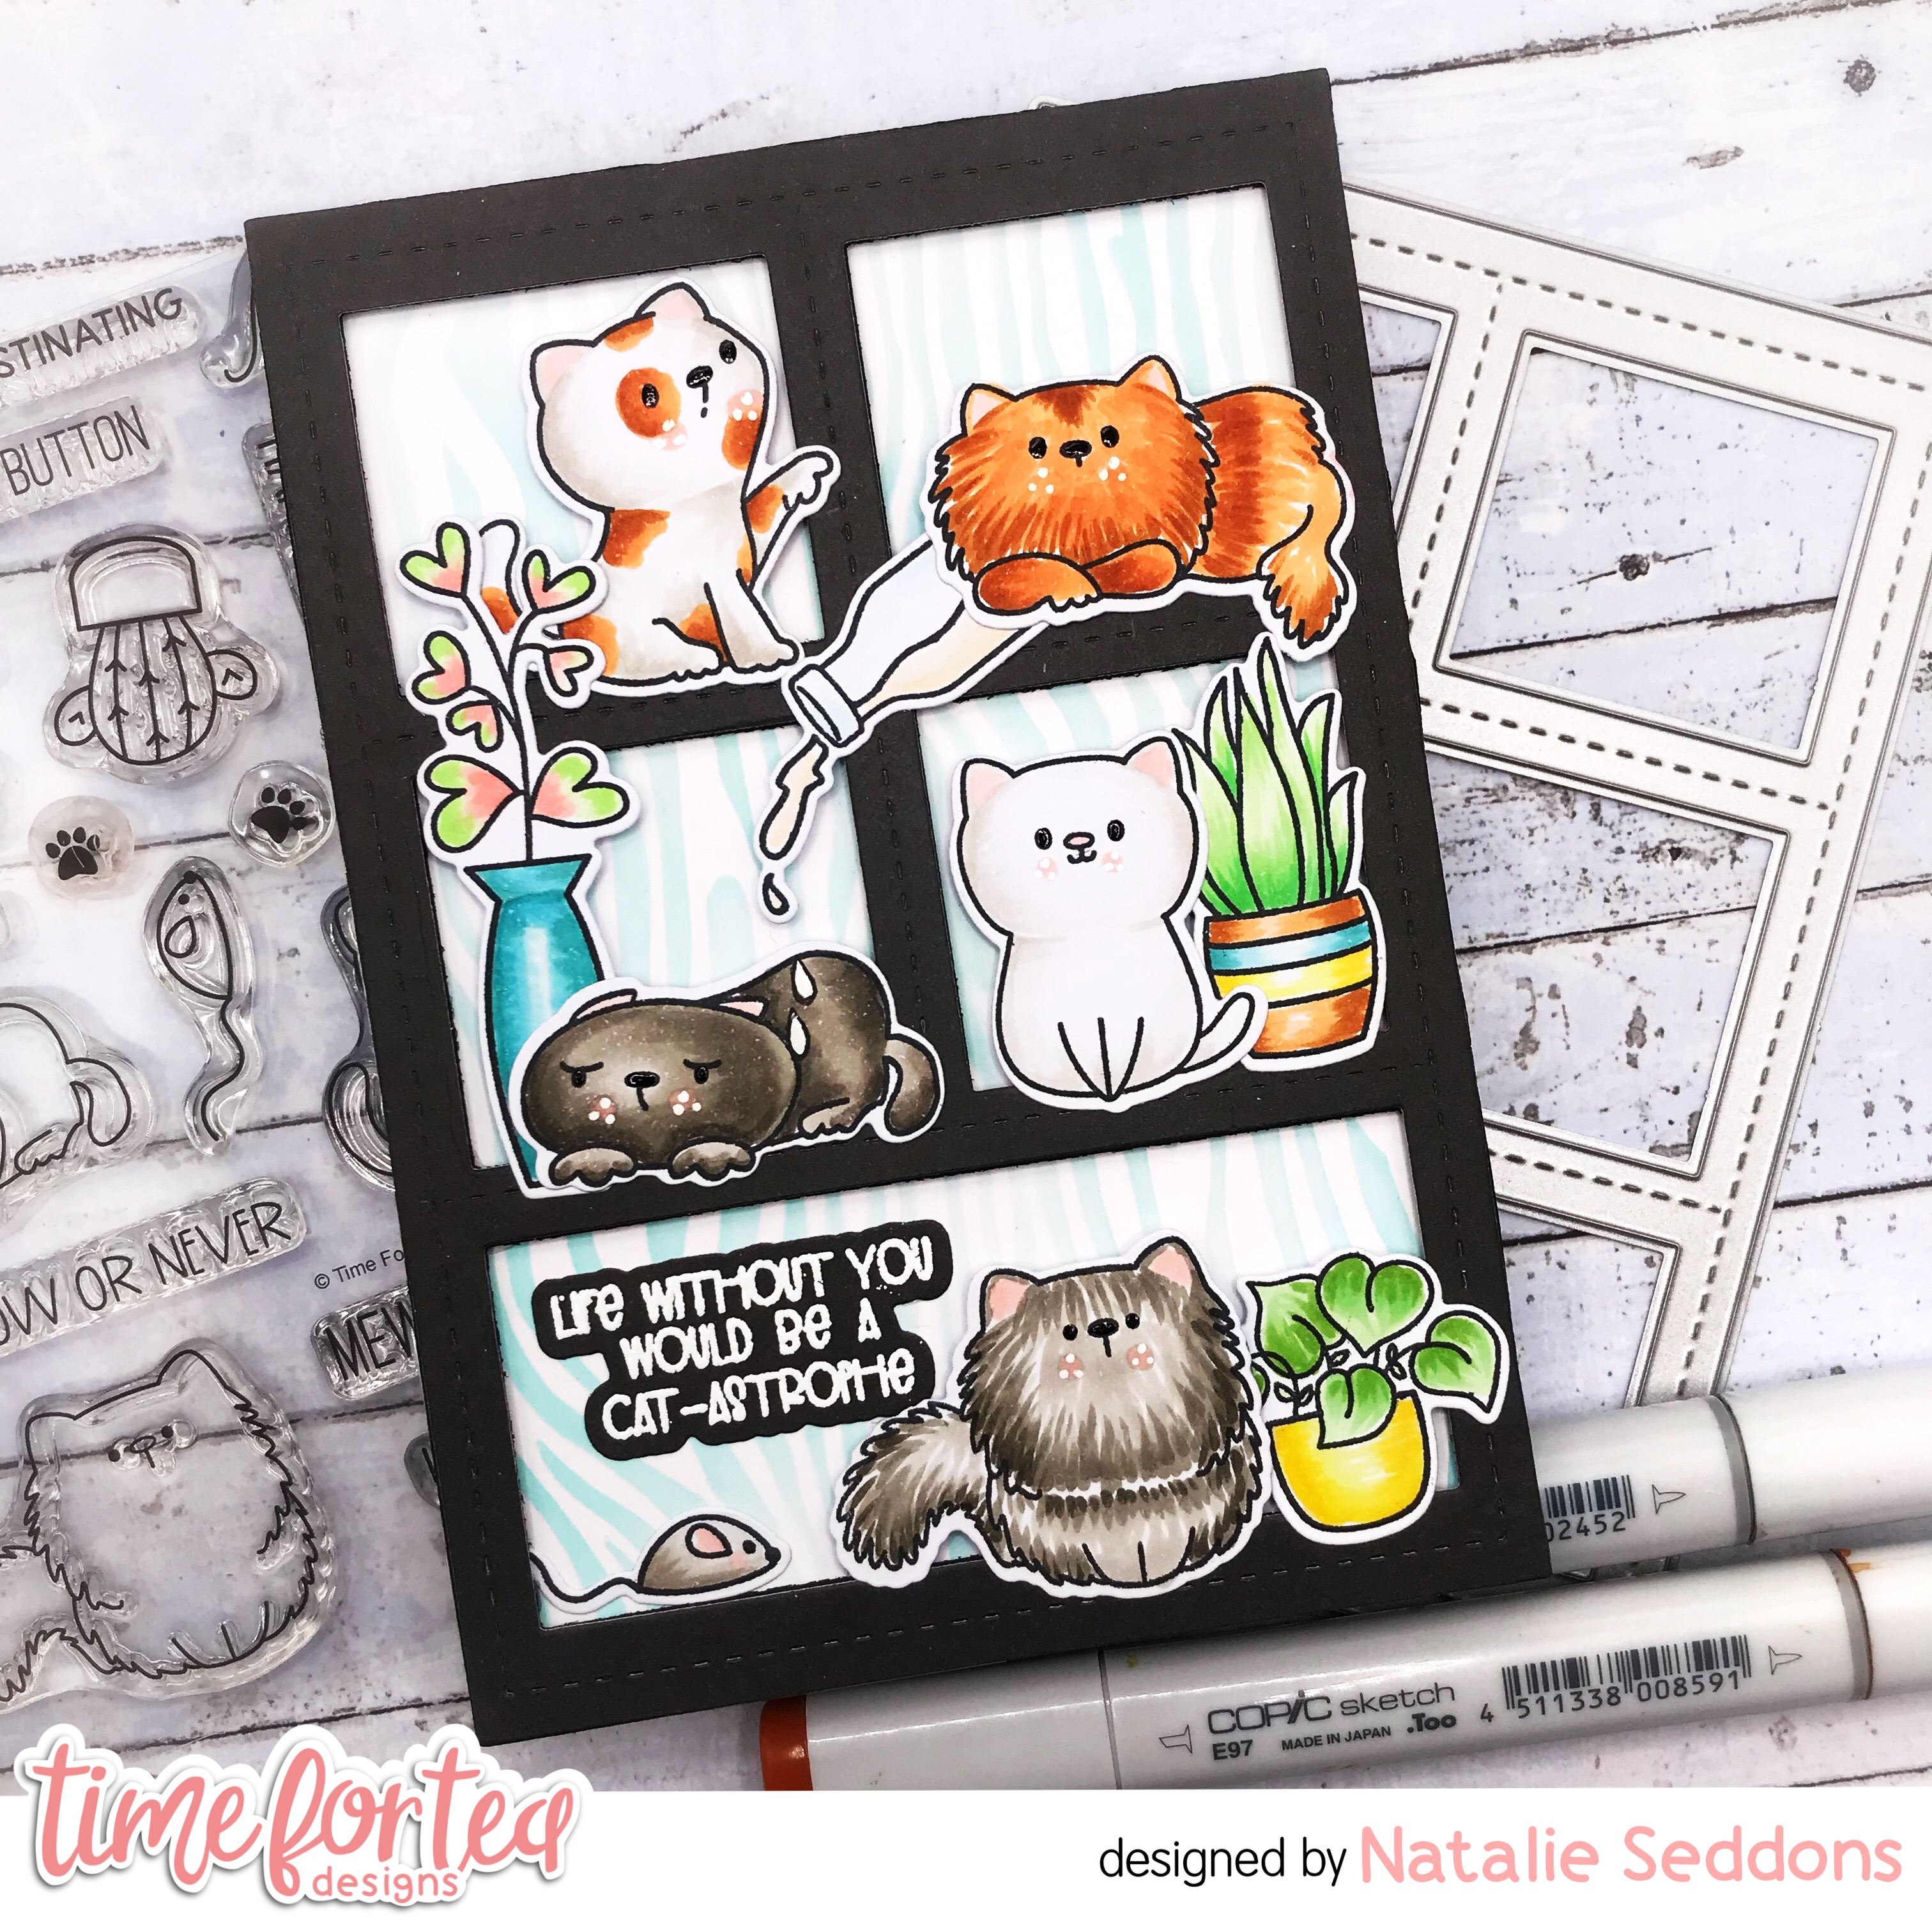
Life without you would be a catastrophe!

Happy Saturday Teatimer's the new release is finally in the Time for Tea Shop and wow what a release not only in size but in also in cuteness! The cheeky kitties have to be my favourite, so needless to say they were the first ones I coloured up. 
I used the Stitched Window Die to create a shelving unit and added the kitties from the both the Kitty Capers and Purrfect Day stamp and Die sets. I love how the furry ginger kitty is like it wasn't me whilst the other kitty is watching whilst there's milk spilling the milk over that poor grumpy kitty underneath. 
The two stamp sets work so well together but you still have so many images in each set alone to create a super fun scene. Underneath the images I used the new Tiger Stripes stencil to create a subtle wood effect behind. It just gives a little more detail so the background is not so plain but subtle enough to take over the card. 
I hope you like my card for today don't forget to check out the Time for Tea Shop for more inspiration and see the full release and if anything catches your eye you can get 10% off using code T4TNATALIE10. Have a great weekend and happy crafting!


Saturday, 30 April 2022

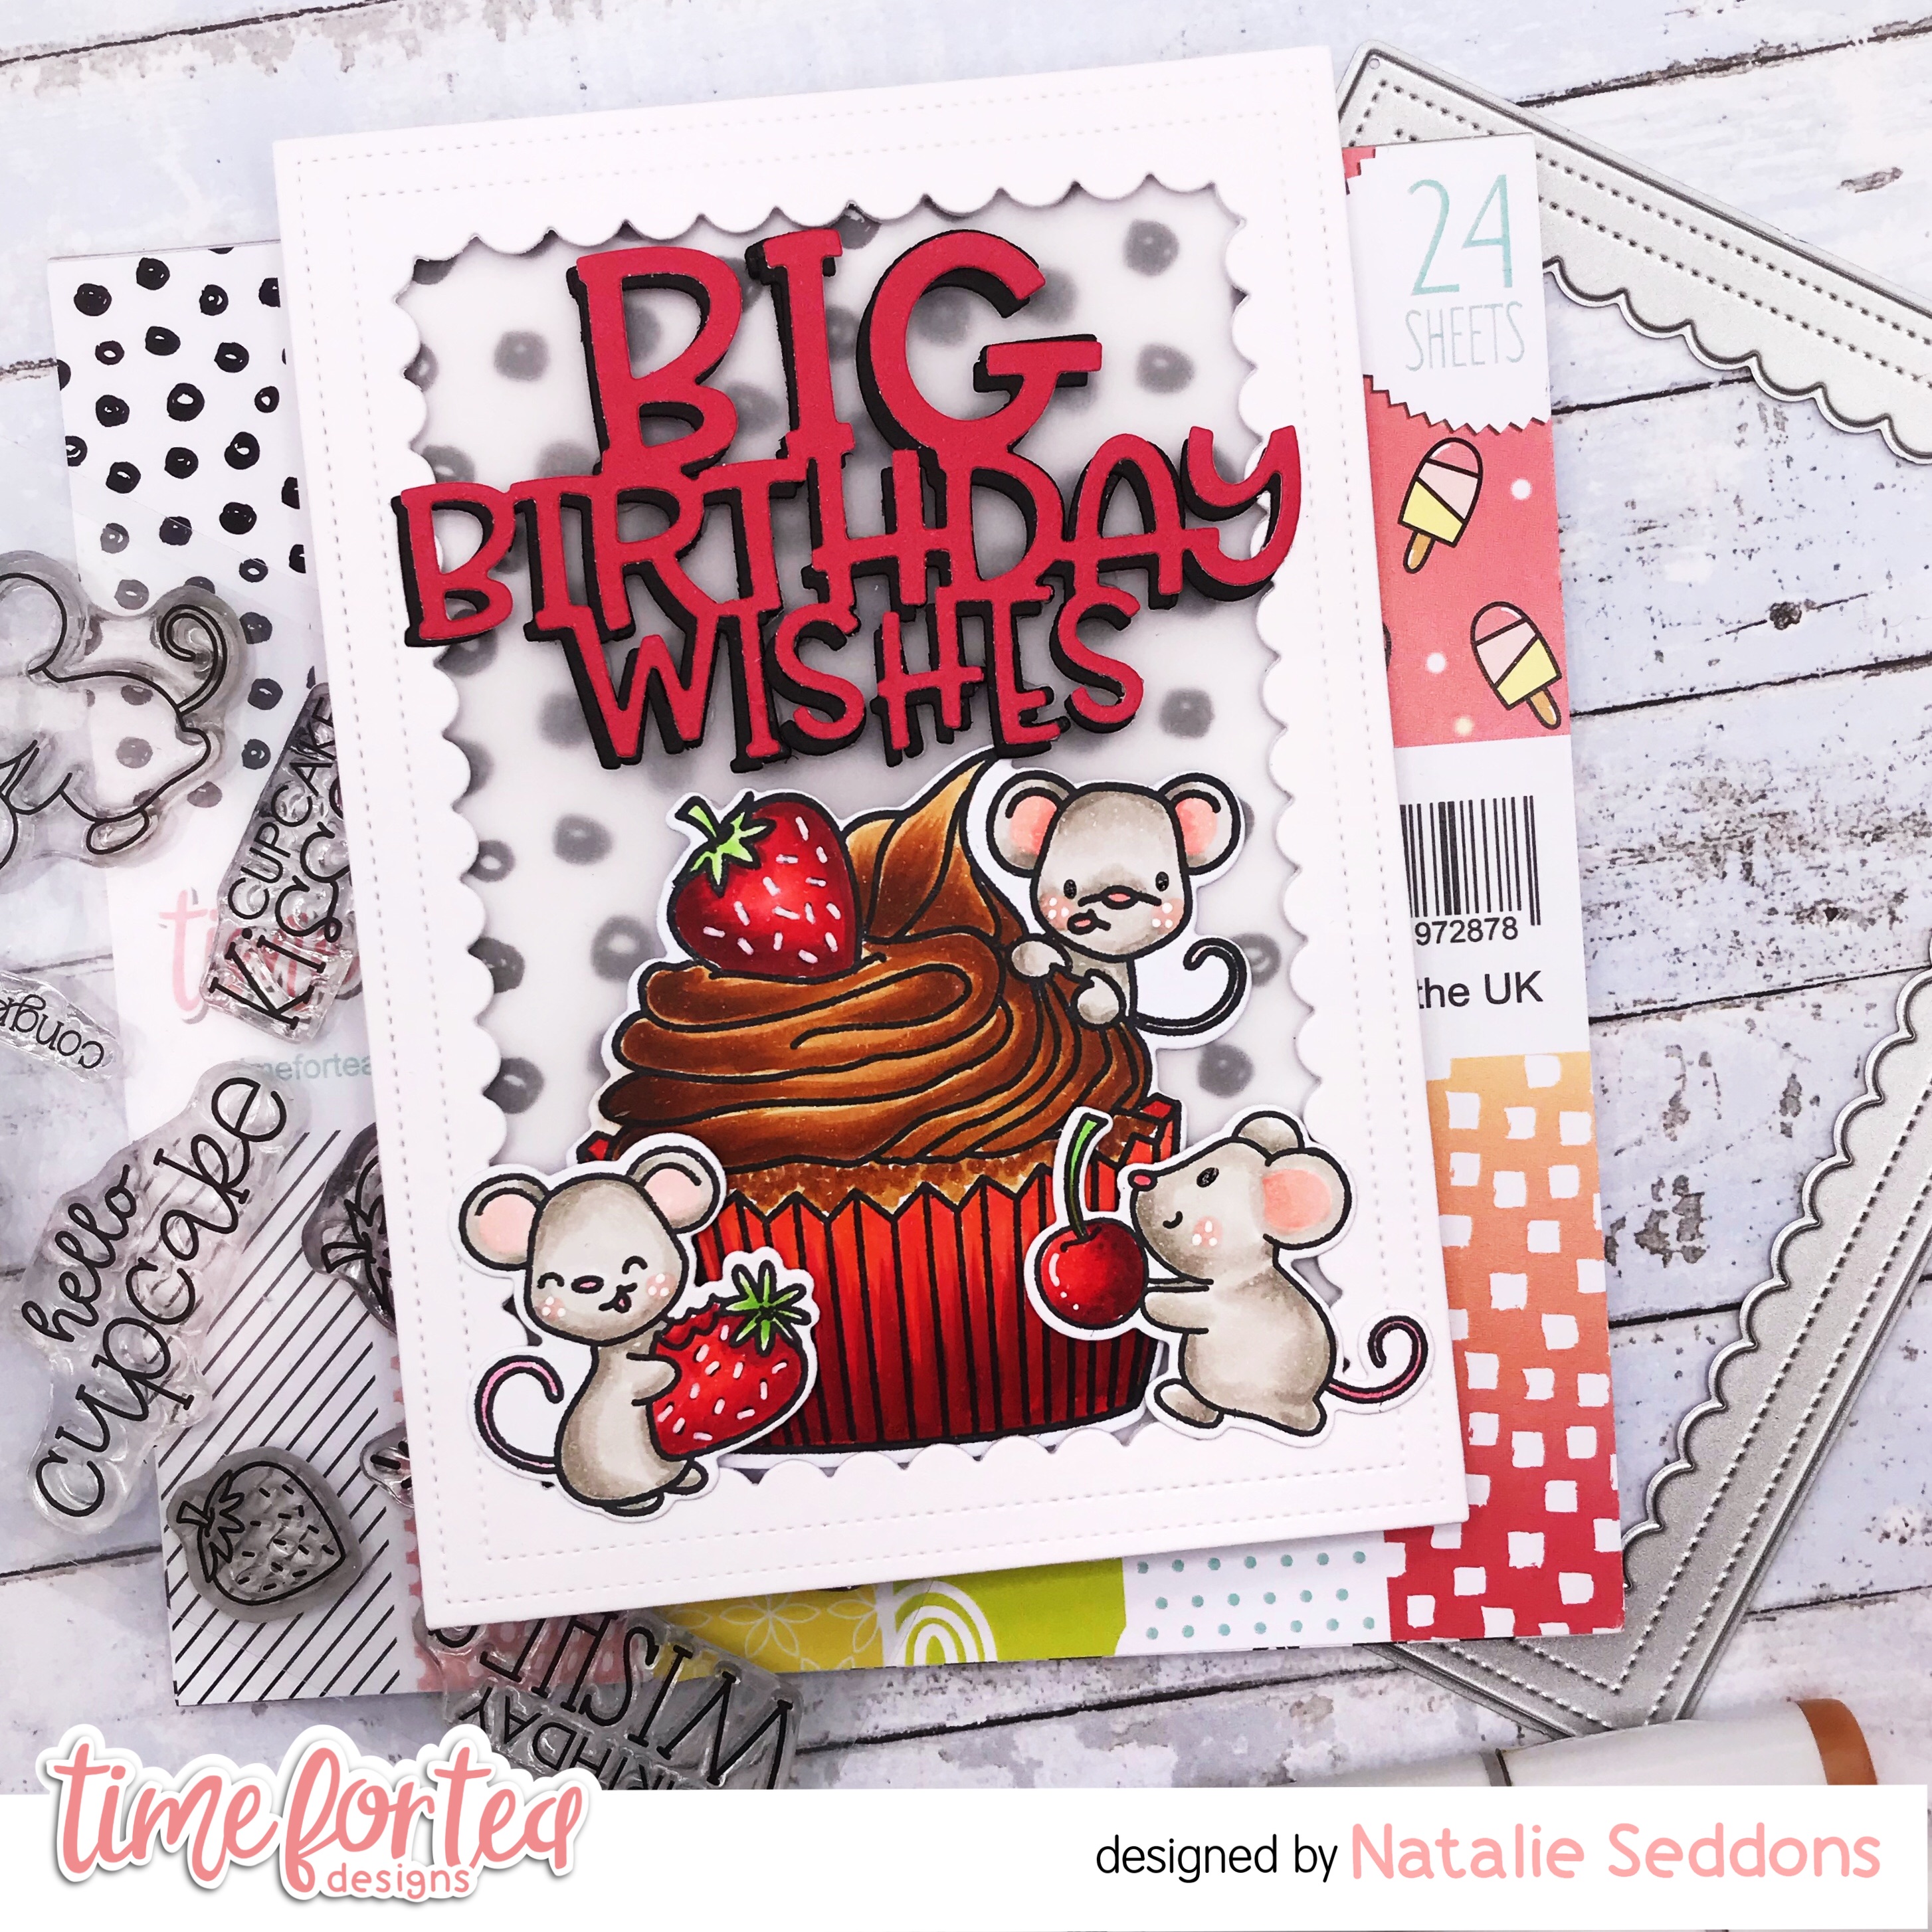
Big Birthday Wishes!


 The weekend is finally here again, have you anything nice planned? I’m hoping for a crafty day 🤞 I’ve been trying to build up my Birthday card stash as I can never seem to find one when I need one and the Hello Cupcake Stamp Set with the Big Birthday Wishes Sentiment Die is a perfect combination for this. 

I really wanted to create a rich chocolate cupcake and combined it with red since strawberries are red. Creating an almost monochrome look for my card. I love how mixing up the colours gives a completely different to your card. Here's one I made a couple of months ago with the same set using a range of pink tones.
 

The pinks make it really sweet and cute where I feel the rich red and brown combined with the monochrome background give it a more sophisticated grown up feel. 
For my latest card I used the Smile Inverted Frame Dies to create a frame for my card and layered the cute polka dot paper from the Sweet Summer 6x6 Paper Pad and layered some Velum over the top to tone it down a little. It's a great technique for adding some interest to the background but toning it down so it isn't quite so busy. 
Once the background was layered up I just popped on the rest of the images. For the Big Birthday Wishes Sentiment I layered red card over the top of the black for a little added interest. 
I love how my card turned out and my Birthday card stash is slowly coming together. This one is such a quick and easy card to make and you could easily mix up the colours for a whole different look. 
If you want to purchase any of the items you can find them in the Time for Tea Shop and get 10% off your order using code T4TNATALIE10 
Thanks for reading and have a lovely weekend!


Saturday, 16 April 2022

You are Sweet!


 Happy Saturday everyone, it’s DT member Natalie here. Have you got anything planned for the bank holiday weekend? I’m so excited to have three whole days off, it doesn’t happen very often so I’ll definitely be making the most of it 🥰 
It only seemed fitting for a sunny day to have a fun ice cream card. I used the Sundae Sweeties stamp set to create my card and combined it with the Geometric Snowflakes dies to create like an ice cream cone background. Then using the A2 stitched Hearts Cover plate die to create a blank space for my kitty so it didn’t get lost in the busy background. 
For the dripping ice cream I cut out a rectangle the same size as the background. Then using the 6 x 6 Splish Splash Stencil I lined up on the corner and drew and outline to create my shape. I didn’t want the drips to rip so I inked it up first using distress oxides and layered the confetti stencil over the top. Once that was finished I cut it out and layered it onto my card. 
I had to finish up my card with some white gelly roll stars and some sprinkles on the ice cream. 
It’s such a fun card and I love how it turned out. You can find all the products in the Time for Tea shop and get 10% off using code T4TNATALIE10 ❤️ 


Saturday, 2 April 2022

You are so Sweet ❤️


 Happy Saturday Teatimer's it's Natalie here with a super fun summer shaker card. If you can remember back at Christmas I made a similar card turning the Take Out Coffee Cups Dies into a shaker card. 


You can find all the details on how I made the shaker here
I thought a bright, summer milkshake version would be super fun.  I wanted to show you how you could make two of the same cards but change a few elements like the colour and shaker bits and you get a completely different look for a new season. 
Instead of sequins I used small fruit shaker elements and some tiny ice cubes then instead of snow I added grass and went for pops of pink, yellow and orange as opposed to the cold blues I used for the winter card. 
As you can see two completely different but similar cards, I just love how it turned out. 
If you want to recreate your own version you can find all the supplies in the Time for Tea Shop and get 10% off any orders using code T4TNATALIE10. 

Saturday, 19 March 2022

Have a Cool Birthday!


Happy Saturday Teatimer's anyone else longing for warm summer days again?! It's been so wet and miserable recently that I decided to create my own summer's day instead, I just love that cheeky little skunk with their two fab ice lollies. It does look a tad warm in front of that hot sun though.
To make my card I used the Skies the Limit Slimline Dies which I cut out twice from white 360gsm card making sure to keep all of the cut out pieces. I then adhered the two die cuts together and layered on top of another piece of white card. 
Taking the die cut pieces I ink blended Squeezed Lemonade and Dried Marigold for the sun and Tumbled Glass and Faded Jeans for the sky. Adding splatters on top using the same colours. Once dried I adhered the pieces back together. 
For the grass I took some white card the same length and used the Slimline Hillside Scene Dies to cut out the grass. I ink blended this with Twisted Citron and Rustic Wilderness Distress oxide again adding splatters with the same colours. 
The last thing to do for my card was colour up those cute critters from the Cool Critters Stamp Set. I used Copic markers to colour them up using a small range of colours so they all coordinate. I finished them up by adding some extra details to their cheeks and the skunks ice creams with white gelly roll and some pastel coloured Signo Uniball pens. Once they were all coloured I cut them out using the coordinating dies and adhered them to my card using foam tape to add some depth. 
The last thing to do was add some dots and stars using the pastel pens and a gold gelly roll pen to add a little texture and some more details and that was my card finished up. I hope it brought some sunshine to your day! You can find all the products in the Time for Tea shop and get 10% off your order using code T4TNATALIE10. 


Saturday, 12 March 2022

Let's Catch Up!


Happy Saturday Teatimer's have you had a good week? I decided to mix things up this week and make a tag using the Happy Mail Die to create this fun cafe scene. I began by cutting out the Happy Mail Gift Card Holder Die twice out of the white card and cutting off the legs. Then in one of them I cut out a rectangle to create the window for the cafe front. Using the rectangle that I cut out I used the Small Inverted Scallop Frame Dies to create the canopy at the top and coloured it with yellow Copics and cut out a strip to create my counter top. Which I coloured up using a range a range of cold greys to create a marbled effect.
Taking the bottom tag piece I ink blended some Squeezed Lemonade Distress Oxide Ink. Then on top I adhered some white card that I had cut out using the Geometric Snowflake Cover Die, to create a tile effect for the background. For the front tag piece I blended Abandoned Coral, Picked Raspberry and Kitsch Flamingo Distress Oxides and spritzed some water on to add some texture. I also took the Floral Bloom Stencil and used the Abandoned Coral to create some flowers and outlined them with a white Gelly roll pen. Lastly cutting out a hole on both pieces for the ribbon using the die from the Memory Keeping Essential Dies Set. 
I stamped out the critters from the Cafe Critters and added the coffee cart from the Snappy Before Coffee Stamp Set. I coloured them all up with copic markers and again added some with gelly roll to add some finishing touches.  
When adhering everything together I added foam tape to create layers so the critters were more in the foreground and there was some depth between the ones in the cafe and the dog that's making the coffees. This makes the tag look more 3-D and as though the dog is behind the counter of the cafe. 
It was fun to mix it up a little and do something different to a card I hope you like it too. You can find all the supplies in the Time for Tea shop and get 10% off your order using code T4TNATALIE10
Have a great weekend and I will see you all next week!


Saturday, 5 March 2022

Stop Beavering Away!


Happy Saturday Teatimer's its Natalie here with a sweet Beaver card for you today. I finally got a chance to use the new Stitched Slimline Slopes Dies it's a great die for creating scenes with.  
I started out by cutting out the die and inking up the inside panels. Adding clouds in the top one with the slimline scene builder stencil some green distress oxides for the grass and a combo of blues for the water. Finishing off with some texture by adding splatters using the same colours I used to blend. 
The beavers and accessories and trees are from the Beavering Away Stamp Set which I coloured up using copic markers. Then I added the bulrushes from the Lucky Duck Stamp Set alongside the dragon fly and fly. 
After everything was cut and coloured I layered it all together on to my card base and finished it up with my sentiment which I stamped out and heat embossed onto black card. That was my card finished off it was a really quick and easy card to make but looks super fun. I hope you like my card for today you can find all the products in the Time for Tea shop and get 10% off your orders using code T4TNATALIE10. 
Have a great weekend and Happy Crafting!