Saturday, 29 January 2022

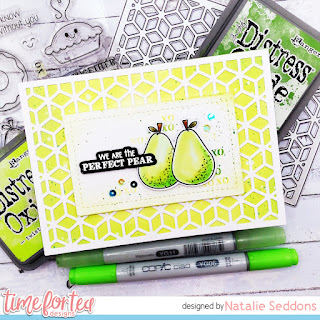
We are the Perfect Pear!


Happy Saturday Teatimer's hope your all well, how fast has this week rolled around! I have a fun Valentines/Anniversary card for you today. I decided to go for non traditional colours as I loved the citrus colours on the pears. I also did two versions to show you how it could be more traditional and then more cute with the addition of sweet faces and a bit of blush.
I just love how it gives a while different look to your card!
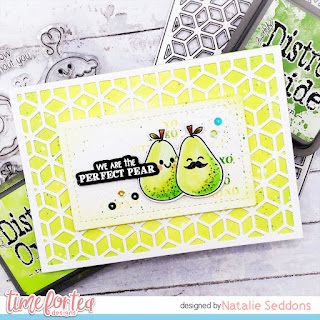


It was a really simple and quick card to create I started by cutting out the Geometric Snowflakes Cover Die and then using that as a template to cut out a back panel of the same size. I used white 360gsm card and coloured it up with Twisted Citron and adding some texture by splattering some water on and then dabbing it off. Then finishing it off with some splatters of mowed lawn distress oxide ink. 
Setting this aside to dry I worked on the topper, the panel is cut out using the A2 Stitched Hearts Cover Dies. Again I splattered the panel with Twisted Citron and Mowed Lawn to add some interest. 
The pears are from the We Go Together stamp set I stamped them out onto copic paper and used a range of green copics adding some dimension by adding the darker colours towards the bottom. Then adding some dots to give them a textured look. 
The sentiment is white heat embossed on black card stock and then die cut using the coordinating dies. I added the sentiment and the pears before sticking and realised it looked a bit empty so added some xoxo's using the xo stamp in the same green inks. Then adhered them using some foam tape and adhered everything together and that was my card finished up. I hope you like it and if you want to purchase any of the items or anything else in the Time for Tea shop you can get 10% off using code T4TNATALIE10 . Have a great weekend and I will see you all next week. 


Saturday, 22 January 2022

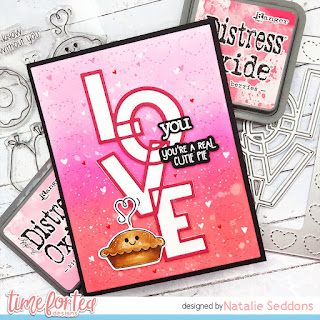
You're a Real Cutie Pie!


Happy Saturday Teatimer’s are you loving the new release? It’s another super cute one isn’t it! You may have peeked this card yesterday on the blog/insta hop so I thought I’d share with you how I made it. 
All the products are from the new release I started by cutting out the A2 Hearts Stitched Cover Dies and did an ombré effect on it with Candied Apple, Picked Raspberry, Kitsch Flamingo and Spun Sugar Distress Oxide inks. Finishing it by spritzing water and then added splatters with the same colours and some gold watercolours. Setting this aside to dry I worked on the rest of the card. 
I wanted some depth with the Love Intertwined Die so cut it out 3 times with white 360 gsm card stock and layered them on top of each other. Then for the last layer I used some hot pink paper. I adhered this to the card panel I set aside so I could then layer in some glittery white paper. 
The sentiment and little cutie pie are from the new We Go Together Stamp Set. It’s filled with adorable images and I love how it has extra little faces you can add to the images that don’t have them so you can customise them yourself. Again with the coordinating dies they cut out the sentiments which is something I love about Time for Tea. It’s gives you a different option than the usual sentiment strip or just stamping straight onto the card. Once my pie was coloured and the sentiment heat embossed (the you I masked and stamped from the yourself sentiment in the Bold Sentiments Stamp Set) and cut out it adhered them to the card adding some depth with foam tape. I adhered my card to a black card base and that was it finished up. I hope you like it and if you would like to purchase any of the items in the shop you can get 10% off your order using code T4TNATALIE10 . Have a great weekend and happy crafting! 

Friday, 21 January 2022

Time for Tea Blog Hop!


Time For Tea Designs is celebrating its January release with a blog and Instahop. There will be one randomly drawn winner for Instagram and one randomly drawn winner for the blog hop. Each prize will be a £25 gift card to the store. Hop along to see some amazing inspiration from the T4TD DT using the release.

All you need to do is:
1. Comment on this post and each of the DT hop participants.
2. The hop will close at midnight on Sunday 23rd January UK time.
A random draw of all those who comment on instagram and/or the blogs of the DT taking part will take place on Monday 24th January and the winners announced shortly after on T4TD Instagram story and the T4TD blog.
The next stop on the hop is ..............
If you get lost you can find the complete list on the T4TD blog HERE.


Jayne

Kitty

Lyndsey

Mihaela

Natalia

Natalie

Natasha

Vicki


Hope you have enjoy all the inspiration you can tell how much the team have enjoyed creating with this release, all the samples are gorgeous!


Saturday, 25 December 2021

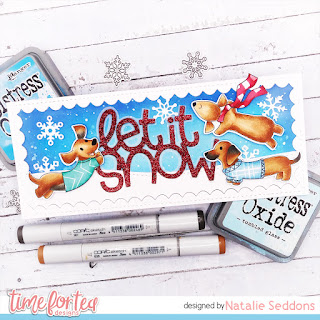
Merry Christmas!


Merry Christmas everyone it's DT member Natalie here with a super cute Christmas card for you today. I just had to sneak in a last minute Christmas card with the Dachshunds. 
It was a pretty quick card to make I already had the Dachshunds coloured up. I love having pre coloured images ready it makes my life so much easier especially when time is short around this time of year. These cuties are new in the shop and are called Stop Dachshund Around. I also used the Sweet Summer and Brighter Days Paper Pads to paper piece there cute jumpers. 
To make the background I used the 
Falalala Die set to make the base which is one of my favourites at the minute it also includes gorgeous snowflake dies. 
I cut the die out of white card stock and ink blended a combination of blue distress oxides on the inner panel. I finished it off with a spritz of water and added some splatters of white acrylic paint. This just gives some added texture. 
Whilst this was drying I cut out another one of the falalala die again in white card stock and used the Slimline Hillside Border Dies to create the snow bank. With the off cuts I also cut out my snowflakes. 
Then all what was left to make was the sentiment. I love big sentiment dies and the Let it Snow one is so much fun. I cut out the sentiment in red glitter card and used some velum to cut out the back piece. I like the added interest of the velum but that you can still see the background behind. 
Then all was left to do was stick everything together I only glued the velum behind the sentiment so that you couldn’t see the glue and I added some foam dots to the dogs to give them some dimension and that was my card finished up. 
I hope you have a wonderful Christmas and a Happy New Year. Also don’t forget if you want to treat yourself in the shop you can get 10% off any orders using code T4TNATALIE10 ❤️ 

Saturday, 18 December 2021

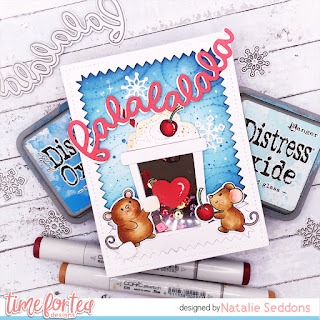
Falalala Coffee Shaker Card


Happy Saturday everyone, I have been so excited to make a shaker card with the new Take Out Coffee Cup Dies. It was really easy to do too but you never know maybe one day Jo will do an add on set for us 😉
The rest of the card was pretty simple to do so to avoid a lengthy blog post I'll let you know how I made the shaker part. I began by cutting out the cup part out of 360 gsm white card twice, once out of brown paper and then again from white fun foam. I adhered the brown paper onto one and then on the second one I needed to cut out a window for the shaker. So using a ruler I measured 5 mm from the edge all around using dots to guide me then just joined them up using the ruler so it was all nice and straight. 
Then using the line as a guide I cut out the inside using my craft knife you want to make sure your blade is nice and sharp to get a clean cut, I used this then as a guide to cut out the middle of the fun foam and adhered them together with a piece of acetate sandwiched between them. 
I found it was easier to add the sequins into this part and adhering the brown paper onto the back. I used a mix of chocolate, gold and burgundy sequins as I was thinking about the Costa Coffee Black Forest Hot Chocolate when I was making this one. If i did it again though I feel like a pop of cream would have been great in there too!
Once this part was put together I added the rim of the cup in the same white card and cut out the cream for the top adding a little colour with some brown Distress Inks. I also cut the cream out of fun foam too so that it sat at the same height as the cup. I finished it up with a cherry and a heart die for a little extra detail. 
I just love how this one turned out and again I got to mix sets old and new which you know I love, Time for Tea stamps just work so well together which is what I love about them, it means you can still keep using your old favourites but adding a new twist with new designs!
For the rest of the card I used the Baked with more Love stamps, Hello Cupcake Stamps, Zig Zag Frame and Tag Dies, Falalala Scalloped Slimline Dies, Slimline Hillside Scene Dies  and the new Snow Flurry Cover Plate Die. I told you I liked to mix and match my sets didn't I 😂
I hope you like my card for today if you want to purchase any of the items in the Time for Tea Shop you can get 10% off your orders using code T4TNATALIE10 . Happy crafting and have a great weekend!


Saturday, 11 December 2021

Christmas Joy


Happy Saturday Teatimer's how you doing with your Christmas cards? I'm so far behind with mine Christmas has really crept up fast.  Today I have a tutorial for a snowy wreath shaker card you can find all the details below. 

Materials 
• Acetate 
• Wow Gold Embossing Powder and Embossing ink
• Copic Markers 
• Red and White Cardstock 
• Copic Paper 
• Plaid Bow
• Iridescent Fake Glitter Snow 
• White Fun Foam
• Wood Print Paper 


How to Create 


1) Cut out the A2 Nesting Frame Dies twice out of fun foam then once each from the white and red card stock.
2) Adhere the largest red frame on top of the largest white frame then adhere these on top of the acetate using cosmic shimmer glue and cut the acetate to size. Layer the two fun foam frames underneath. Flip over and fill with the iridescent Fake glitter Snow and adhere the wood print paper to the back. 
3) Stamp out the wreath onto the Copic paper, colour in using Copic markers and cut out using the coordinating dies. Cut out the fun foam using the coordinating wreath die and adhere the wreath stamp on top using Cosmic Shimmer Glue. 
4) Adhere the wreath straight onto the acetate and add the little plaid bow on top.
5) Heat Emboss the Joy stamp onto red card stock using Gold Embossing Powder and cut out with the coordinating dies. Adhere onto the card and then adhere the shaker frame onto a card base.
I hope you liked today's tutorial let me know if you prefer this style or the usual one and don't forget if you would like to pick any of the products up in the shop you can get 10% off your order using code T4TNATALIE10 💗
 Have a great weekend and I will see you all next week!

Saturday, 4 December 2021

Festive Christmas Cheer!


Hi Teatimer's it's DT member Natalie here with some Christmas inspiration. I love how Jo has created some festive elements to add to the Open the Door Die set the new set is called Open the Door Holiday Add on Set and comes with lights, a wreath some fun trees and other bits and pieces. It also has a fun element too as it can open, on this occasion though I decided to keep it closed so the wreath and the other details were the main focus along with the mouse (from the Baked with More Love Stamp set) and their huge stack of presents.
It was such a fun card to make and not a lot of colouring involved so nice and easy to make. I did a stencilled background with the new Tiled Wall 6 x 6 Stencil but decided to keep a white on white look and just add texture using an embossing paste. I think this keeps your eye on the main feature but adds a little interest to the background. 
I just love how it all turned out it's such a cute fun Christmas card to make and I can't wait to see your versions. It could be quite simple like mine or you could really bling it up and add more glitter, snow and baubles. Don't forget to share with us when you do and if you want to get any of the products used in my card or anything else in the shop you can get 10% off your orders using code T4TNATALIE10
Have a great weekend and Happy Crafting!


Saturday, 27 November 2021

Yum, Good Food, Good Friends!


Happy Saturday Teatimers the new release is finally here! What did you think? It's such a cute release and so versatile. I had so much fun colouring up the Baked with More Love stamp set I teamed it with the new Snow Flurry Cover Die and the Yum Sentiment Die from the new release. 
My plan to was to create a cookie that the little mice had baked and used the Yum so it looks like the mouse on the right had iced it. To do this though I needed to stamp my images by reverse stamping them. It was super easy to do though I just stamped them onto my silicon mat and then laid my copic paper over the top and rubbed it so the image transferred. After colouring just to give it a sharper black line I just went over with copic black outliner. 
I love the texture the Snow Flurry Die created too it just shows how versatile it can be. I'm now thinking well how about with the new Takeout Coffee Cup Dies it can be a the swirling coffee in the cup there's just so many ways to use it. 
I really love how my card turned I'm seriously regretting using the scallops to cut a chunk out of the edge like teeth mark though and having the other little mouse just peeping chomping away! So maybe I'll have to recreate another one!
If you want to pick any of the products up in the shop or another other items don't forget you can get 10% off in the shop using code T4TNATALIE10.
Have a great weekend and I will see you all again next week 💖


Saturday, 20 November 2021

Falalalala!


Happy Saturday everyone it's DT member Natalie here with a fun Christmas Coffee card for you today. The little reindeer's from the Happy New Year Critters are just one of my favourite designs from Jo and you can guarantee they will appear in so many of my Christmas designs. 
I was unsure what to make for my post today so tipped out all my coloured images I already had and  and had a tonne of the reindeer's left over. There was also the coffee cart and the hippo which got me thinking that the reindeer's might like a caffeine pick me up before they take to the skies on Christmas Eve. The hippo and coffee cart which are from the Snappy Before Coffee stamp set weren't quite the right colours though so I stamped them up and coloured them in more traditional Christmas colours.  
The base for the card is the Falalalala Scalloped Slimline Dies which is another one of my favourite Christmas Dies I added some Chipped Sapphire and Salty Ocean for the sky using the darker colour at the edge and blending it to be brighter in the middle. Once everything was stuck together I felt like it needed a few finishing touches with the snowflakes and I added some white gelly roll for some smaller stars and falling snow. 
I just love how this card turned out its such a fun design and I hope you like it too! You can find the products in the Time for Tea shop and get 10% off any orders using the code T4TNATALIE10
Have a great weekend and I'll see you all next week 💖


Saturday, 13 November 2021

Cosy Winter!


Happy Saturday Teatimer’s it’s DT member Natalie here with another super cute card to share with you all. I combined a mix of old and new for this snowy winter scene. I love how versatile the new City Break stamp set is from winter to summer it can be used all year round with just a change of characters and colours. 

I mixed the City Break stamp set with the bunnies  from the Cosy Winter Stamp set and the lamppost comes from the Carolling Critters Stamp Set. The Time for Tea Stamps just mix and match so well with each other, which is great if you love building scenes like I do! 

For the black frame I used the Zig Zag Frame and Tag dies it almost give it a comic feel to the card like the final scene in the book with the happy ever after 🥰 

Snowy Scenes are one of my all time favourites to create so I love how this card turned out and I hope you do too!  If you would like to create your own version and want to purchase any of the itemsu I used in the Time for Tea shop or any other goodies you can get 10% off your order using code T4TNATALIE10 ❤️ 

Have a great weekend and I’ll catch you next week!

Saturday, 6 November 2021

Just Chillin!


Happy Saturday Teatimer’s the weekend has rolled around so fast! I’ve been busy playing with the new products again. I wanted to create a scrapbook feel but with the critters so created this super fun hamster selfie card with the new Memory Keeping Essential Dies. I have a whole series full of critter Polaroids planned in my head so be sure to keep an eye out for those!
To make my card I began by cutting out the Lots of Love Vertical Cover Plate Die in white and a couple of shades of red and pink. I laid the die cut onto my card base and then adhered the hearts randomly on. 
Then it was time to create the selfie I cut out the die out of some Copic paper and took the inside rectangle out. I began by stamping the first hamster from the Hooray Hamster Clear Stamp Set in the middle at the bottom and then stamping it on some masking paper and fussy cutting it out. Sticking this on top makes sure that you don't get ink where you don't want it when you keep repeat stamping. I used all the hamsters and just kept inking and masking as I went. It's so satisfying when you peel the paper off and see the full image underneath. 
After this was finished I coloured them up using a range of browns and greys and taped it back into the frame stamped my sentiment and adhered it to the card base. 
To finish it up I cut out the lol and heart from the new die set and adhered them onto the card and that was it finished up. I love how super cute it turned out and I hope you do too! If you want to buy any of the products to make your own or anything else in the Time for Tea shop you can get 10% off your order using code T4TNATALIE10. Have a great weekend and I will see you all next week!

Saturday, 30 October 2021

Missing You!


Happy Saturday Teatimer's it's DT member Natalie sharing all the details on how I made my cute card from the blog hop yesterday. 
There wasn't much colouring so it was a super quick card to make. I started by cutting out the Sun Ray Cover Plate Die and ink blending Squeezed Lemonade Distress Oxide over the top. I then used that as a guide to cut out the back piece for the sky from white card. This was then ink blended with tumbled glass and the Slimline Scene Builder Stencil. Next step was to adhere the Sun Ray on top of the sky using foam tape. 
To make the scene the road is cut out of grey paper using the Slimline Hillside Scene Builder Dies and layered over the top of yellow paper. The buildings were stamped using the new City Break Clear Stamp Set I used a orange, pink and purple lawn fawn inks to get the pretty ombre effect. I fussy cut it out and layered them both onto the card. 
The car and panda I found in my stash of pre coloured images its such a handy pile to have! You can find them in the Car Critters Stamp Set. I adhered them to the card but it just needed a few finishing touches so I stamped out the hot air balloon from the City Break stamp set and the Sentiment is from the Speech Bubbles Clear Stamp Set and that was my card finished up. I hope you love the new release as much as we do! As you can see its super versatile and great for both journaling and card making. 
If you want to get any of the new products or anything else in the Time for Tea Shop you can get 10% off your order using code T4TNATALIE10. Have a great weekend!

Friday, 29 October 2021

New Release Blog Hop and Giveaway!


Hello TeaTimer's it's new release time and we want you to celebrate with us by joining our Blog Hop and Instagram Hop for a chance to win a giveaway! 
Make sure hop along with us for lots of inspiration as well as a chance to win a £30 voucher to the Time for Tea Designs shop. To participate leave a comment on each of the Design Team members blog's. We are also doing an Instagram Hop so be sure to check that out too!

Here is the complete blog hop list, see you there!:

Annalisa Boccia

Jane Taylor

Jayne Vaughan

Lindsey Turner

Natalia Neila

Natalie Seddons

Silvia Galloni

Here's my super fun card for the hop using the new City Break stamps I love how it combines so well with all the older stamps and die sets. Here I mixed it up with the Sun Ray Cover Plate Die, Slimline Hillside Scene Dies, Speech Bubbles Clear Stamp Set and Coordinating Dies and the Car Critters Clear Stamp and Die Set to make my card. As you can see the memory keeping stamps are super versatile so perfect for cards and in your journals.   


A random draw will determine our winner* and will be announced right here on the T4TD Blog & IG stories on Friday, the 5th of November.

*one winner will be drawn from the blog and IG hop participants

***